
Build a Play Set from a Kit
- Matt Weber

- Nov 2, 2023
- 6 min read

Building a simple swing-set is a fairly straightforward DIY project, but designing and constructing a large, elaborate play set can be quite a challenge and an expensive, time-consuming chore.
An easier solution for the handy homeowner is to assemble the project from a kit, as the HIR staff did with the Endeavor play set from Backyard Discovery. Compared to purchasing the individual components of a similar play-set design, the cost of the Backyard Discovery kit might even be less than shopping for the materials yourself—and a heck of a lot easier. All the hardware has also been chosen for you, including heavy-duty metal plate connectors and precisely sized screws and carriage bolts for each phase of assembly.
Plus, the all-cedar play set reduces waste and expense because all the components are pre-
cut to size, saving you many hours of labor and significant money in lumber. With the small, tight knot structure of cedar, the wood is less likely to develop small cracks from knots. Cedar is also naturally resistant to rot and decay. Plus, the lumber is already pre-stained for a smooth and clear appearance, as well as stamped with the part number to help speed up the building process.
And when it comes to assembly, the easy-to-follow instructions are laid out in simple step-by-step format with clearly marked illustrations. By following the clear and concise directions, a single person with a few key power tools can complete assembly over the course of 2-3 days—much more quickly than it would take to build a similar play-set from the ground up. (Some pilot-hole drilling may be required.)
Here’s a look at the Endeavor project and a few thoughts on our experience assembling the kit.


Features of the Kit
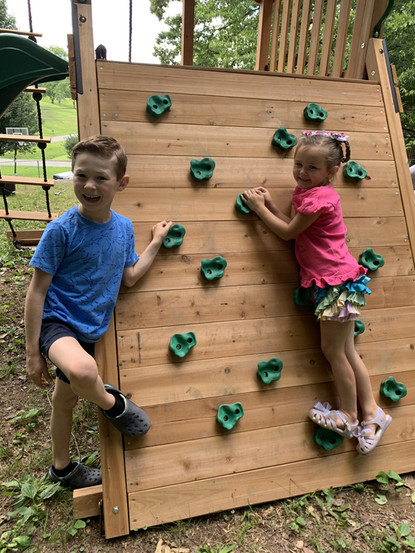
If you’re old enough to assemble the project, then chances are likely that you aren’t hip the newest in-demand amenities of modern play sets. Backyard Discovery has it all figured out, and the Endeavor kit features a climbing wall, rope ladder, and a double-wide rock wall. Two traditional belt swings are accompanied by a large 40-in. full 360-degree spinning web swing. At the top is a roof-covered fort with a 5-foot deck that opens to a 10-ft. wave slide. The play-set meets and exceeds all ASTM standards for safe, reliable construction.
Site Prep
Prior to ordering a play set, check the manufacturer’s guidance regarding the footprint of the project. Construction requires a relatively flat site with proper drainage that has enough area to encompass the play-set’s footprint plus a “safe zone” around the base for the kids to play—usually an additional 6 feet of unobstructed room around the perimeter.
You’ll need to clear and mow the building site and even level the ground in some situations.
On our site, the ground had a slight slope toward the front and left-hand side. To accommodate this, we compacted the ground with a hand tamper then laid rows of 16-in. square concrete pavers as a foundation beneath the front wall and left-hand side of the play set. This achieved a level foundation and added extra moisture protection to the wood components, which would be slightly elevated above the soil.

When selecting a site, you’ll need fairly level ground and enough area to build the play set plus a 6-foot “safe zone” around its perimeter.
Assembling the Play Set
Expect the assembly process to take a few days, so plan according to the weather.
The entire kit was shipped to our location in three large boxes. You will need to empty all the contents of each and arrange the building components so the part numbers are clearly
visible. A little organization at first will make it much easier and faster to locate the parts identified in the instructional manual. The hardware is similarly organized with all the
bags labeled according to size.


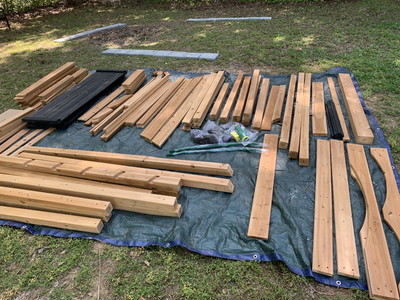
Arrange all parts and supplies according to the log numbers stamped on each of them (or printed on the bags of fasteners).
The large number of parts and hardware might appear daunting at first, but don’t get
discouraged. Follow the instructions, and you’ll quickly see progress in your project.
Just remember how they say you’re supposed to eat an elephant (one bite at a time).
For a project like this, the advantages of building from a kit are plentiful. The time and hassle it saved me could be measured in days, not hours. I didn’t have to source materials from different places or calculate all the different fasteners I’d need. All the materials arrived on site pre-cut and pre-drilled, which is perfect for any DIY’er with limited tools and equipment. Plus, each wood component shows up prefinished from the factory, and that alone might save enough time and labor to convince some folks that this is the way to go.
A few standard power tools, such as an impact driver, will help with assembly. The kit even includes the required screwdriver bits for the many bolts and fasteners. I found that a cordless impact wrench came in handy for some of the larger hex-head bolts and lag screws.
A single worker with a strong back can assemble the play set over a couple days (I did). However, without a helper you’ll occasionally need to hold or support the project using a
couple of sawhorses and even a sturdy ladder. This will help keep the leg and swing-set
assemblies upright while you connect some of the larger frame components.
Some of the major frame connections are made with metal plates that strengthen the areas prone to the most torsion and tension.
It’s important to level the frame as you progress. Adjustments made to the play set’s ground-level contact points will be easier to address before you’ve built it into a large,
heavy mass that is difficult to lift and move.
Much of the assembly is connected using carriage bolts and T-nuts, which is a smart design because the T-nuts remain safely flush with the wood, rather than have a metal projection that can cause potential injury. It’s important to note, however, that whenever
the T-nuts are specified, they should first be hammered into the pre-drilled holes before inserting the carriage bolts. Doing so will sink the burrs of the nuts into the wood, which
holds them steady and prevents slipping or spinning when driving the bolts.
Some simple on-site fastener organization will also make your job easier. I recommend using a magnetic screw tray for the various phases of the project. Otherwise, cleaning up an accidental spill while you work can be a very frustrating way to stop your progress.
Even though the play set includes a roof, no roofing experience is required for assembly. In fact, the roof kit comes as six pre-assembled panels which can be installed while standing
on the deck and fastened to the frame from below. It's fast and easy.
I was greatly satisfied with the building experience as well as the quality of the Backyard Discovery product. Genuine cedar, stainless fasteners, metal plate connectors … These are select materials that will stand the test of time. My three kids are having a blast playing in the backyard every day.

Critical connections that are subject to a lot of movement and wear are strengthened with metal plates.

An impact driver and this cordless Metabo-HPT impact wrench (model WR36DE) helped to speed up the assembly process.

The kit is assembled in a few large separate sections, so that even a single worker can assemble the set over a couple of days.

Most of the carriage bolts are tightened with T-nuts, which should be hammered flush with the wood surface prior to driving the bolts.

Be sure to level the assembly as you go, so it doesn’t get too heavy to move if you need to make an adjustment.

If you’re working without an assistant, you’ll need some sawhorses or a sturdy ladder to help hold the large sections upright while you make the connections.

I appreciate such details as notched stair stringers and pre-drilled pilot holes, knowing how much time and later it would take me to do that work myself.

You’ll be working with a lot of fasteners, and simple equipment such as a magnetic screw bowl can help you keep the site tidy and organized.

When faced with repetitive tasks, it saves times to pre-position your fasteners then fire through them with your cordless driver for faster productivity.

Need to install a T-nut but have no clearance to swing hammer? Try using a clamp to sink the nut flush with the wood, then drive in your carriage bolt.

The play set is chock full of features, including a rope-climbing wall, a rock-climbing wall, web swing, wave slide, toy telescope, cow bell and more.

The roof installs as six modular panels which you can assemble from atop the deck of the play set.

Tighten all fasteners to strengthen the connections and reduce movement in the frame. If using a high-torque power tool, however, don’t over-tighten the carriage bolts to the point that the bolts pull the T-nuts below the wood surface

Final Step is to bolt on the ground screws and drive them into the ground to prevent any tilting in the play set when the children swing.

The play set shown is the Endeavor model by Backyard Discovery. Find out more about the company’s kit-built offerings at www.backyarddiscovery.com.


The Zelex doll has become a remarkable innovation in the world of realistic companionship. Crafted with advanced silicone technology, these dolls feature lifelike skin textures, expressive facial details, and customizable options that cater to personal preferences. Beyond aesthetics, Zelex focuses on quality and realism, making their dolls ideal for collectors and enthusiasts alike. With precision engineering and artistic design, each Zelex doll offers a unique blend of beauty, durability, and craftsmanship that continues to impress users worldwide.
Click here provide members with discounts on over-the-counter medications, vitamins, and health essentials, promoting better health management and cost-effective wellness solutions. kaiserotcbenefits.com - more details here
Click here help you find recent death notices, providing information about funeral services, memorials, and tributes for loved ones in your area. obituariesnearme.com - more details here
Click here? Many users have had mixed experiences with the platform, so it's important to read reviews and verify deals before booking. istravelurolegit.com - more details here
AV在线看 AV在线看;
自拍流出 自拍流出;
国产视频 国产视频;
日本无码 日本无码;
动漫肉番 动漫肉番;
吃瓜专区 吃瓜专区;
SM调教 SM调教;
ASMR ASMR;
国产探花 国产探花;
强奸乱伦 强奸乱伦;