
Installing a Range Hood
- Matt Weber

- Dec 30, 2022
- 5 min read
Updated: Jan 2, 2023

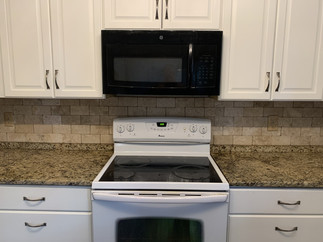
The homeowners on Windwood Drive in Gardendale, Alabama, had never liked the look of their kitchen’s bulky microwave oven/vent-fan combo, which was mounted right above the stove in the center of the room. During a recent remodel, they decided to ditch the clunky microwave and go with a new range hood.
The lady of the house chose the Hauslane UC-PS38 range hood because it’s packed with features to suit the best cook in the kitchen. The under-cabinet extractor fan cleans grease, smoke, fumes, and cooking odors from the air with its six-speed fans. Although most range hoods have trouble capturing smoke from the front burners, the unique panel design of this model creates suction all around the hood to provide maximum coverage for your cooktop.
This pro-style vent hood not only cleans the air but can then clean itself. Using an internal water supply, the exhaust fan steam-cleans and rinses its own hood and ventilator fans at the touch of a button with no water line required. Out with the Old
Your situation may not require removal of an old microwave oven, but if you do have to remove any overhead appliance, be sure to recruit an assistant or else devise a way to support the weight once its mounting fasteners are disconnected.
In our case, we used a cabinet jack to support the oven’s weight. The oven was top-mounted to the cabinet by two carriage bolts, which we removed, but its bottom rear edge was supported by a wall-mounted cleat. Be sure to inspect your appliance carefully because they can be fastened in many different ways.


Plan Ahead
Before ordering your range hood, check that you’ll be able to install your model at the correct height. To ensure the best performance for the Hauslane PS38 model shown, the bottom of the range hood must be between 24 and 30 inches from the top of the cooking surface. For gas ranges, the required distance is 30 inches.
Make sure your main electrical voltage is in line with the required voltage outlined on the rating of the hood.
The range hood must be ducted to the outside using 6-inch ductwork, and you’ll need to use an existing duct or have one professionally installed. Avoid connecting the range hood to exhaust ducts that carry any type of combustion fumes like fireplaces, boilers, or any similar items. Use a minimum number of transitions and elbows when running the ductwork.
Note that installation of the range hood will be greatly assisted by using a cabinet jack (or jacks), which you’ll need on site for installation day.
Prepare the Cabinet
Measure the size of the range hood’s outlet connector relative to the underside of the cabinet. If it is not already done, you’ll need to cut an opening in the cabinet large enough for the outlet adapter pass through. The same goes for the power cable, which is located at the rear corner of this range hood. If you need to cut the cabinet, use a ruler and pencil to measure and mark the area, then cut with a jigsaw. (We cut the power cable passage with a drill and a spade bit.)


Study the range hood’s installation manual to determine its method of mounting. For the PS38 range hood, four screws will be driven through the top of the range hood near each corner, fastening it to the underside of the cabinet through designated screw holes.

Important note: If you’re installing the range hood under a cabinet with a recessed bottom, you should add 4-in. filler blocks made of plywood or solid wood on each side to stabilize the cabinet for secure mounting. Fiber-board cabinet bottoms don’t have much holding power for the screws, but adding the filler blocks will provide stronger wood grain for a better grip to the screws.

Prepare the Range Hood
After you unbox your range hood and confirm that all the necessary parts are included, plug it in and power it up to test all functions before installing.
Refer to the manufacturer’s instructions for specific guidance on preparing the hood for installation. For example, on the model shown, we had to attach an adapter (and rubber gasket ring) at the top of the hood, which connects to a 6-inch duct.

Incidentally, that 6-in. fitting required us to modify our 8-in. duct with an 8-to-6-inch reducer, which is an accommodation you might also have to make.


To connect the range hood to the ductwork, we had to remove the old rectangular fitting of the microwave oven and replace it with an 8-to-6" circular reducer.
Secondarily, we had to remove the panel filter and bottom cover to gain access to the mounting holes from the bottom of the hood. The panel covers usually snap into place, but refer to your instructions on how to remove it.
Find a Helper
Range hoods are best installed by two or more people due to their size and weight. In fact, Hauslane’s user manual recommends that you hire a certified technician for installation to reduce the risk of damage or injury. However, the unit simply plugs into an outlet, so if you can mount it in place, then you can make the connection.
Prepare the Cabinet Jack
If you are leaving the oven range in place during installation of the hood, place a sheet of plywood (30x24 in.) over the cooktop to avoid possible damage from the cabinet jack.
Important note: Cabinet jacks are available in a range of sizes that extend and retract to various lengths. Through trial and error, we learned that our shortest cabinet jack was too short to raise the hood into place, while our medium-sized jack was too long to fit between the cooktop and cabinet bottom. Our solution was to screw wood blocking to the bottom of our shortest cabinet jack to provide the necessary reach once extended. The blocking at the bottom also broadened the area of the footplate, which provided more stability to the cabinet jack.
You should save time and frustration by first measuring the extended reach of your cabinet jacks, compare it to the reach needed to install the range hood, then make any necessary adjustments. Also, avoid measuring from the cooktop to the lowest edge of the hood, because the cabinet jack will contact the hood’s interior ceiling, which is recessed inside the hood a few inches deeper than its bottom edge.
You should also attach a second piece of plywood on top of the cabinet jack to broaden its point of contact and provide better stability.

Place the cabinet jack (or jacks, if using two) on the plywood and have your assistant help you lift the range hood onto the cabinet jack.
Carefully raise the jack to lift the range hood into place under the cabinet. Keep the hood steady as you situate it into the proper position.
Make sure the outlet adapter and power cord enter the cabinet openings and that the cord isn’t pinched between the hood and the cabinet.

In the top of the PS38 hood are four keyhole slots, the shape of which suggest they’re designed to slip over the screw heads after they’ve been driven partially into place. However, the size and shape of the hood make it difficult to shift it incrementally. Instead, we recommend you move the range hood into its final position, ensuring it is level, and then drive the mounting screws with washers through the narrow slots of all four screw holes. To easily reach the rear mounting holes, use a bit extender for your power drill or impact driver.

Be sure the hood is securely attached before removing the cabinet jack and plywood.
Plug in and turn on the hood to make sure the damper opens and closes freely. Insert the duct into the adapter and tighten the screw to lock it in position. Wrap the joint with aluminum foil tape to make it airtight.
Once you reassemble the filter and cover, the new range hood should be ready for operation.


Comments