
How to Build a Hidden Door
- Matt Weber

- Dec 14, 2023
- 9 min read
Tips for Building and Installing a Secret Pivoting Door

Mystery! Intrigue! Excitement! A hidden door in your home can conceal a passageway, serve as a curious conversation piece, or both. A pivoting hinge, also known as a bookcase hinge or a rotating hinge, is a popular choice for creating a hidden door that seamlessly blends into the wall. In this article, we share some tips on how to build and install a hidden door using a pivoting hinge.
Kit vs. Construction
To add a pivoting hidden door, you have three options: (1) pay a contractor to turnkey the entire project, (2) order a hidden door kit and install it yourself, or (3) build your own door and frame.
Option #1 is the most expensive choice but probably the easiest for your stress levels. Option #2 can save time and labor if you have the appropriate tools and some experience installing doors or windows. Option #3 can save money on materials and allow you the most versatility in design, but construction can be difficult and frustrating, especially for first-time builders.
Hidden-door kits are available in a range of sizes and styles from a few different companies. The doors can be designed to look like bookcases, wine racks, wainscoting, full-length mirrors and more. Prices for single-door kits range from $1,100 to $3,000. Double-door kits are also available. The kits include detailed instructions that may differ from this article.
The prefinished kits also come with the door constructed to align perfectly at the pivot point of the matching door jamb and provide the necessary clearance for operation. This is a big advantage compared to building from scratch, because determining hinge alignment and
proper door clearance can be the trickiest parts of construction. But we have some tips to help with that!

Our project involved removing an old stock door panel to replace it with a new bookcase-style hidden door that will conceal a small closet beneath a staircase.


Before removing the surrounding door trim, first cut the caulk lines with a utility knife
Use a small, flat prying tool to loosen the nails of the molding.
Protect any of the surrounding furnishings by masking it off with painter’s tape.
Constructing the Door
Since the door panel can be built as a bookcase, a wine rack, etc., this article won’t spend much time on those details. The panel is usually constructed of a combination of plywood and solid lumber or MDF trim. It is important to make sure you have solid material (wood framing on concrete) at the top and bottom of the door panel to drill out, mortise and install the pivoting hinge.
The door panel shown in this project was built as a basic bookcase, fastened primarily with pocket screws and Titebond wood glue.
The door must be installed square, level and plumb within the jamb for proper operation. If the surrounding door frame is not square, level and plumb, you will have to correct the problem by constructing a new door jamb on all sides of the door frame. This construction may include a sill plate across the bottom of the door, in which the bottom pin of the pivoting hinge will be mounted.


After removing the trim and the door, I found the surrounding door frame was neither level or square.
To make sure I had a plumb, level and square frame in which to install the pivoting door, I installed a new door jamb and sill made of 1x6.
Shim the jamb as necessary and fasten it in place with screws or finish nails.
Mapping Out the Pivoting Hinge
Before constructing the door panel, it’s important to understand how the pivoting
hinge mounts into the top and bottom, how the panel will operate, and what clearances
are required for unobstructed door-swing.
Pivots are nearly invisible on most doors. Most single doors only require a top and bottom pivot. Make sure the hinge you select is rated to carry the weight of your door. Installed along the top and bottom edges, the pivot transfers the weight of a door to the top and bottom of the opening, which will often make it easier to operate the door than if it were hung from the side using butt hinges. This effect means that pivots can be used with over-sized or heavy doors. They also tend to last longer and require less maintenance than butt hinges.

When you unpack the pivot hinge, you’ll find a paper template that includes dimensions for holes and recesses that must be installed in the door and frame. You will need to determine where on the door and jamb to install the pivot hinge based on the size of your door panel.

The 1x6 door sill provides a mounting surface for the bottom hinge bracket.
First, determine the size of your door panel based on its function. For example, I built the the bookcase panel with shelves deep enough to hold books and Blu-ray movies. I also accounted for shelf nosing and trim. Door panels can vary in size, but it’s important to determine the overall front-to-back depth of your panel.
To find placement of the pivot hinge on the door panel, I recommend cutting a
rectangular cardboard sheet to the same depth as your door panel. Next, cut the cardboard rectangle an inch shorter than the width of the door frame.

Use the paper pivot-hinge template to trace the bottom hinge near the corner of the cardboard rectangle. (Keep the hinge at least 1 inch from the edges of the rectangle so it does not interfere with the sidewalls or face-frame once the door is constructed.) Then, align the edge of the rectangle that’s nearest to the hinge along the outswing side of the doorway’s sill plate. Center the cardboard in the doorway so it represents the door panel.
Using the pivot-hinge template as reference, drive a screw through the cardboard at the exact location of the hinge pin. Now, move the cardboard template within the doorway as if opening the door, using the screw as a pivot point. Depending on the size of the cardboard, its corner will likely contact the door jamb, indicating that a door of that size will be too wide to open.

You can then alter the cardboard’s depth or length. In my case, I wanted the shelf depth to remain constant, so I shortened its length by folding up and cutting away the edge of the cardboard rectangle until it cleared the doorway by 1/4 inch when opening and closing. Check all corners of the cardboard to make sure there is no interference in the travel of the cardboard, which represents the footprint of the door you will build. This might take a little trial and error. If it’s too tight on the hinge side, you might need to relocate the pin position.

Once you have trimmed the cardboard to the point that you’re satisfied with the way it functions as a door, clearly mark the pin location on the sill plate (or floor) for installation later. Then, use the exact measurements of the carboard sheet as a construction template to build the final dimensions of your door. The cardboard will also serve as a placement template for the hinge, showing the exact mounting location of the pivot hinges on the top and bottom of the door.


Build your hidden door panel to match the template.
The cardboard template will show the location of the hinge on the door.


The cardboard template will show the location of the hinge on the door panel.
Use a hammer and wood chisel to carve a mortise in which to recess the hinge bracket.
The hinges will need to sit flush with the surface of the door and the surrounding frame.
What about the height of the door panel? Refer to the pivot hinge’s packaging for any recommendations regarding overhead clearance between the door and the frame. For the Tambee brand of pivot hinge used for this project, I built the door 5/16 inch shorter
than the height of the frame.
The pin location of the upper hinge must align perfectly plumb with the lower one you marked on the sill plate. A plumb bob or laser level can help to transfer and mark its location on the top of the door frame. The top hinge engages the door by lowering the pin into place (when you use a screwdriver to adjust the bracket).
Both the top and bottom hinge assemblies come with two mating brackets. You’ll need a wood router or hammer and chisel to create a recess for the jamb brackets. These brackets will sit flush with the surface of the frame.
Drill any holes that are shown in the hinge template.
The mating hinge brackets will also need to be recessed flush into the top and bottom of the door. A hammer-and-chisel or router can be used to cut the mortises.
The hinge will include all the necessary screws to fix the brackets in place.

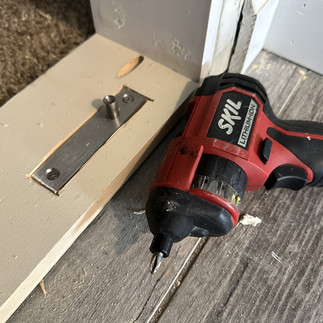


Install the bottom hinge bracket (with the spindle) into the door sill.
Use a plumb bob or laser level to locate and mark placement of the top hinge on the door frame.
Make sure you have plenty of solid wood at the top of the door frame, because you will have to drill out clearance for the hinge pin.

The pivoting hinge will include all necessary hardware and fasteners for installation.

The top and bottom of the door will need holes drilled for the hinge brackets. After drilling, you can add a trim piece or extra shelf to conceal the hole.

Be sure to install the top bracket of the upper hinge so you’ll be able to reach the adjustment screw after the door is set into place.
Installing the Door
Add any plates or components to the hinge as indicated on your template. The Tambee hinge utilizes a ball bearing that must remain seated in the bottom hinge for proper operation.
Note: For bookshelf doors, I recommend installing the “carcass” or empty case (without the shelves) for more manageable weight at this phase of the project.
It may help to recruit an assistant to install the door. Set the door by lifting or tilting it into place so the lower pivot bracket (on the bottom of the door) fits over the spindle installed in the floor. Align the upper hinge brackets, then use a screwdriver to turn the screw of the top
bracket to engage the pivot pin.
Check that the door is operating correctly and adjust the pivots according to the manufacturer's instructions.


Align the top hinges, then turn the adjustment screw to lower the hinge pin into the hinge bracket.
Test the door for operation then add any shelves or accessories.
Adding the Trim
After the door panel was completely installed and functioning correctly, I added the shelves and trim.

The illusion of hiding the doorway is achieved by clever use of trim and molding.

For the most convincing effect, the door should look like the door is built as an immovable feature of the wall, incorporating baseboards and crown molding in a style that matches or complements the existing trim in the room.
The face of the door panel can be decorated with a trim package that makes it appear as though it’s built into the wall. This is done by framing the panel with trim boards that are
fastened to the wall on the hinge side but are fastened to the door panel on the opposite
side. With careful installation that maintains even reveals and shadow lines, the vertical trim on one side will detach from the wall when the door is opened, then the boards nest back into place once the door is closed again. The overall effect makes the panel appear to be a stationary part of the wall whenever closed.


Side Note
3 Big Mistakes I Made
Okay, time for the confession booth. This was my first time building anything with a pivoting hinge. I made some mistakes I want to point out in hopes that you avoid them on your project.
Door-swing direction. Since the pivoting hinge is situated inside the door frame, rather than its edge, the door panel doesn’t allow as much passage space as a standard butt-hinge door. And the deeper the door panel, the more space within the doorway it occupies. I didn’t account for this when I initially installed the door with hinges on the right-hand side. I figured the open door would align against the adjacent wall rather than obstructing the hallway to the left. In practice, the adjacent wall stopped the door from opening very wide, and the depth of the bookcase made gaining access through the doorway (into a closet) too cumbersome. I solved this by moving the hinge to the other side of the bookcase—a lot of extra work.
Pivot-bracket alignment. When installing the pivot hinge, understand that the pivot points of the hinge must align, but the brackets that extend from those pivot points do not have to line up with each other, providing more versatility for placement. This can be especially important with the top hinge bracket, because once the door is in place, you need to access the bracket’s adjustment screw to engage the top hinge pin. One of my mistakes was positioning the top bracket so the adjustment screw was concealed by the door once installed. I couldn’t reach it with a screwdriver. I had to remove the door, add blocking around the door frame (inside the closet), then reinstall the top bracket into the blocking so I could reach the adjustment screw once the door was in place.

Recess the hinge plates. Because the pivot hinges would be obscured by the door panel, I thought I might save some time by skipping the work of cutting the mortises that recess the hinge brackets flush into the door panel and frame. This was a mistake. After wrestling for a while with the heavy door, trying to get the brackets to align, I realized that the edges of the metal brackets were catching each other and preventing the door from fitting. I had to pull the door out, cut the mortises, reinstall the brackets, then fit the door into place.


Choosing the right windows and doors can greatly impact a home’s comfort and security. Quality materials and proper installation help improve energy efficiency and reduce noise. For honest customer experiences and reviews, visit https://windows-usa.pissedconsumer.com/review.html to learn more about various brands and services. Whether updating old fixtures or building new, selecting durable options ensures long-term satisfaction. Don’t overlook the importance of style and functionality working together to enhance your living space while protecting your home from the elements.
AV在线看 AV在线看;
自拍流出 自拍流出;
国产视频 国产视频;
日本无码 日本无码;
动漫肉番 动漫肉番;
吃瓜专区 吃瓜专区;
SM调教 SM调教;
ASMR ASMR;
国产探花 国产探花;
强奸乱伦 强奸乱伦;