
Plumbing Questions Answered
- Matt Weber

- Jul 30, 2025
- 7 min read
Updated: Aug 5, 2025

Over the last several years, the HIR staff has been asked and has answered a multitude of questions regarding home improvement, maintenance and around-the-house repairs. Here’s a look back at many of the different plumbing topics and tips we’ve covered for our readers.
How do I unclog a bathroom sink?
To fight a sink clog, most folks start by using a simple cup-shaped bathroom plunger. Pick a plunger with a large enough suction cup to completely cover the drain and create an airtight seal against the surrounding sink. Seal off any other outlets, such as the overflow drain in sinks, to create a vacuum, then fill the sink with enough water to cover the suction area. Push out any trapped air beneath the cup, then give the plunger 15 to 20 vigorous up-and-down pumping strokes to jolt loose the clog. This may take 3 to 5 times to work.
If that doesn’t unclog the problem, you can remove the drain cover which closes the drain. To do this, first place a bucket beneath the sink to catch water. The drain cover opens and closes using a ball-and-socket lift lever at the back of the sink’s drain pipe. Unscrew and remove the retaining nut that holds the “ball” of the lever to the socket. This should allow you to slide the lever rod out of the keyhole on the bottom of the drain cover. You should then be able to pull the drain cover freely out of the sink drain, which is often what traps hair, objects and other debris in the drain. Use a wire coat hanger and hot water to clear out the drain pipe and thoroughly wash the drain cover before replacement.

If this still doesn’t work, you can use a pipe wrench to remove the P-trap beneath the sink, in which a foreign object may have gotten trapped in the turn of the pipe. You can also run a plumbing snake into the drain pipe past the P-trap to rout out clogs further down the line.
How does cured-in-place-piping work for sewer drains?
Cured-in-place-pipe lining (aka CIPP or structural pipe lining) is a type of trenchless sewer repair for when your main house sewer line is damaged. The “trenchless” term refers to doing underground construction work using a minimally invasive technique without the extensive digging normally associated with sewer repair. CIPP or structural pipe lining involves creating a new pipe within the old one by inserting an epoxy-soaked liner into the damaged pipe and leaving it to cure for a few hours to make the pipe as good as new. The main benefit is that the repair can be performed without having to re-route traffic or dig a trench through your house. It’s faster than conventional methods and can usually be performed in hours rather than days.
Is there a way to install a new single-handle kitchen faucet on a countertop while hiding the holes from the old two-handle faucet?
To replace a three-hole faucet with a single-hole faucet, you need a “deck plate” AKA “escutcheon,” which is a metal plate (usually about 10 inches long) that covers the two side holes in the countertop while providing a center hole in which to install the new faucet. To replace a three-hole faucet with a two-hole faucet, you might consider filling the third hole with a soap-dispenser assembly, which has a nozzle that matches the faucet’s finish and a soap reservoir that stays hidden beneath the countertop.
The upstairs bathtub is leaking, but I can’t find the exact source of the problem. I’ve replaced the faucet valves and the shower diverter, and I’ve sealed and tightened all the plumbing connections. Yet, when someone takes a shower, water still leaks onto the ceiling below. Where could the leak be coming from?
It sounds like you have a bath/shower combo, and if you’ve ruled out everything else, you should inspect the bathtub overflow drain. The overflow drain is usually sealed with a foam rubber gasket which can deteriorate over time. Once the gasket fails, a significant amount of water can pass through the opening.
Replacing an overflow drain gasket is a fairly easy fix. First, remove the screws that mount the cover plate. Pull out the lever assembly, including the drain plug. Remove the old gasket material from the tub and the body of the overflow drain. You’ll need to replace it with an “overflow washer” or “overflow gasket” from the hardware store. The gasket is beveled, so orient it with the thickest side down when installing it. Lubricate the gasket with a little plumber’s silicone grease and work it into place around the mouth of the overflow body. The overflow pipe will have a little play which should allow you to adjust its position and make room for the gasket. Make sure it seats evenly for a complete seal around the connection. Replace the drain assembly and fasten the plate with the two mounting screws to finish the job.
My neighbor recommended that I get a check valve installed for my house plumbing. What does a check valve do?
A check valve, also called a non-return valve, is a small device installed in your pipes to make sure water flows only in one direction. When a flood occurs, sewers can overfill, pushing water back through your plumbing system. Installing the check valve lets water pass down through your pipes as it was meant to do, but prevents it from flowing back up the pipes to a toilet or sink.
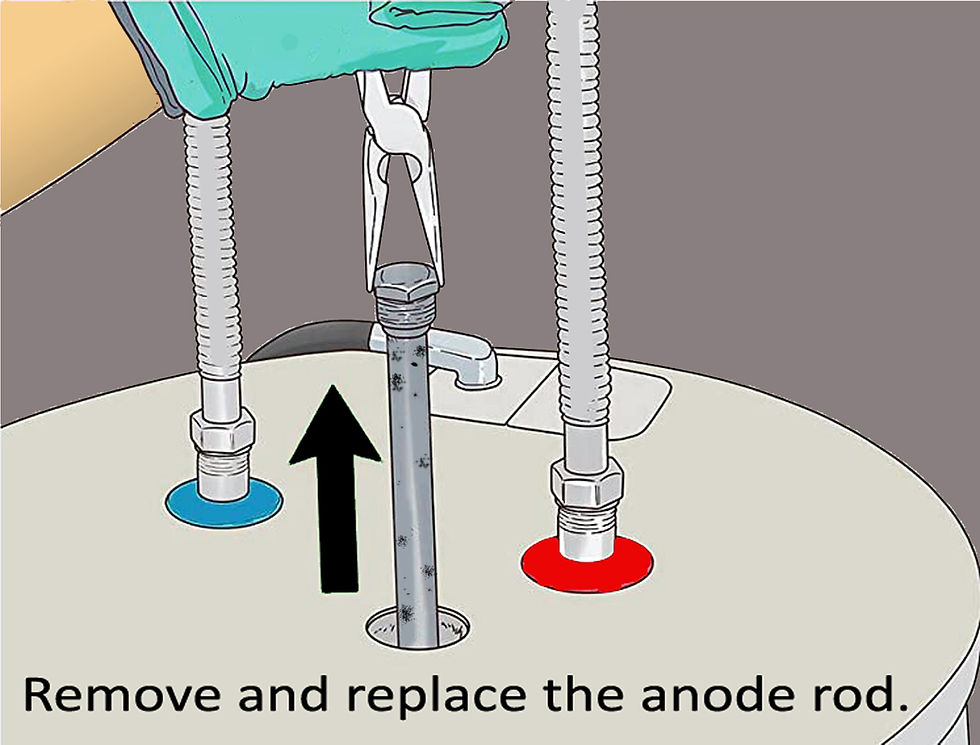
Is there a way to extend the life of a water heater tank?
Manufacturers take two approaches to extending the life of a steel water-heater tank. The baked-on porcelain tank lining is the first line of defense. A sacrificial anode rod, often made of magnesium, is the second line of defense, and many homeowners don’t realize that this anode can be replaced to extend the life of the tank. The rods are typically less than an inch thick, about 42 inches long, and are usually threaded into the top of the tank. As long as the anode rod is degrading in the tank, the tank lining will be protected from rusting. This is accomplished through a process called electrolysis, by which the metals in the anode rod attract ions that normally cause rust in iron and steel. These ions are what cause the anode rod to degrade over time. Eventually, the anode rod will degrade to the point where
it can no longer attract the ions that cause rust. At that point, the rod will need to be replaced in order to maintain protection for the tank. Replacement anodes are available for purchase, and some are sold as flexible rods for easy installation.
Why do I need to flush out the tank of our water heater?
Plumbing experts recommend draining and flushing a water heater’s tank once or twice a year, and if you live in an area with hard water, they recommend flushing it every 4-6 months. The longer it goes without a drain-and-flush, the more sediment and minerals will accumulate at the bottom of the tank. Because most tank water heaters have their heating element at the bottom, the sediment buildup reduces its heating efficiency. If left to accumulate, the mineral buildup could also lead to further problems, including corrosion of the tank or dangerous blockage of the pressure-relief valve. Draining and flushing the tank with clean water will help prevent this.
To drain the tank, first shut off power to the water heater. Turn off the cold water supply. Allow the water to cool. Locate the drain valve and connect it to a garden hose. Turn on a hot water faucet and leave it on until the entire flushing process is complete. Place the garden-hose outlet so the water will flow safely away from your home and your neighbor’s property, then open the drain valve to empty the tank. Once it has drained, turn the cold water back on with the valve still open to help eliminate any remaining sediment. Repeat this step until the water runs clear. Close the drain valve, remove the hose, then turn the water supply back on to refill the tank. Once it is full, turn the power or gas supply to the water heater back on. Remember to turn off the faucet you turned on earlier.
What’s the best way to stabilize a wobbly toilet?
Toilets wobble or rock because of uneven floors. Over time, movement in the toilet will deteriorate the wax ring, which will result in a toilet leak. To fix the problem, sit on the lid to weigh down the toilet and use a wrench to snug down the flange bolts that hold the base to the floor. Be careful not to overtighten them and crack the porcelain. If any gaps remain between the base and floor, insert plastic toilet shims, Available at most ardware stores, toilet shims are small wedge-shaped tabs. When you’ve used enough shims to stop the toilet from rocking, cut off the excess length. If the shims are too tough to slice with a utility knife, cut with a multi-tool or a wood chisel and hammer.
My water bill went up. How do I check for leaks?
High water bills are commonly caused by running toilets, which can waste up
to 200 gallons per day. Leaky faucets can drip up to 20 gallons per day. Check all faucets for leaks, as well as inspect your toilet’s tank and listen for any sounds, such as hissing. In some cases, a valve might need to be replaced or the toilet’s flapper might be worn out. If you don’t find leaks, you’ll need to check your water line and outdoor hose bibs. If you shut off all the water fixtures in the home but your home’s water meter still indicates that water is flowing, then you might have a leak in your home’s main supply line.
What is the easiest way to unclog a kitchen sink?
To clear a clogged kitchen sink, you can try plunging the drain with a cup-shaped plunger. However, this requires creating an air-tight seal in the drain by closing off any openings, such as plugging the other basin drain of a twin sink. Also, if a dishwasher is connected to the sink drain, then the washer’s drain line will need to be clamped shut or otherwise sealed closed before plunging.
Plunge the drain rhythmically for six to eight repetitions and repeat if necessary. Rinse
the drain with plenty of hot water. If plunging is not effective, place a bucket beneath the P-trap under the sink and unscrew the two slip nuts at each end of the U-shaped drain pipe. Remove the pipe and clear out any obstruction with a wire coat hanger, then clean the pipe thoroughly before replacing it.
If the clog is further downstream of the trap, remove the drain pipe from the fitting in the
wall and inspect the drain with a flashlight. Any water in the line indicates a clog. Clear
it with a hand-crank or drill-powered auger. When reassembling the pipe, use Teflon thread tape to seal the pipe threads. Tighten all metal drain nuts with Channellock pliers, but plastic slip nuts should be hand-tightened.


Comments