
Barn Door Installation
- Matt Weber

- May 9, 2022
- 4 min read

How to Install the Track and Hanger Hardware for an Interior Barn Door
For the last few years, the hottest trend in interior door design has been the popularity of barn-door hardware which rolls the door along a wall-mounted track. This style of door conserves floor space, plus the track configuration may be applied to double bypass doors and even smaller cabinet doors. As a decorative feature, the hardware itself adds an interesting design element, and it’s versatile enough to support a door made of practically any sort of rigid material with otherwise impossible options in appearance or shape, since the door doesn’t have to be built within the confines of hinge placement.
Ordering the Hardware
Barn door hardware is available in a wide range of styles and finishes with a broad array of accessories, such as decorative wheels, matching door handles, etc. The door hardware kits also come in a range of weight-carrying capacities, so make sure the kit you order can support the weight of whatever door you’ve chosen.
The size of the track will be determined by your door size. Manufacturers usually recommend the track length be at least twice the width of the door (or the opening). For example, if the door or opening is 30 inches wide, you’ll need a 60-in. long track.
The track of a barn door is typically designed with mounting locations spaced 16 inches on center to align with standard wall-stud spacing. However, the location where you’d like to mount the track might not align with the wall studs.
If the mounting holes don’t match the studs, you have two options: (1) You can mount the track using hollow wall anchors, or (2) install a mounting board anchored into the wall studs then mount the track into the board. The wall anchors and mounting board will be sold separately from the kits.
On this project, we went with Option 2 and stained our mounting board to match the existing 1x6 rustic trim already decorating the kitchen.
Preparing the Site
Before you begin, take inventory of the barn-door hardware kit to ensure it includes all the components listed on the contents.

If you’re replacing an old door, make any necessary repairs to the surrounding trim or casing.

Installing the Wall Track
First step is to locate the wall framing with a stud finder. Mark the studs with painter’s tape to avoid pencil marks on the wall.

Place the track in its horizontal position on the wall to see if the mounting holes align with the studs. The midpoint of the track should align with the edge of the door opening.
On this project, a couple of the fastener holes happened to align with the king studs of the doorway, but not with enough studs to satisfy us. Rather than use toggle bolts in the drywall, we installed the horizontal mounting board to give the remaining screws solid material to grip.


The board was fastened with 3-in. screws driven into the studs. Each stud got two screws; a lower decking screw hidden behind the track and an upper trim-head screw filled with putty and stained to match the wood. (Tool tip: A cabinet jack or temporary brace can help support the board when fastening.)
Draw the line for your track. Our kit’s instructions specified that we draw a level line at exactly 1-11/16 inch plus door height above the floor (instructions will vary). We drew a level pencil line on the face of our mounting board.


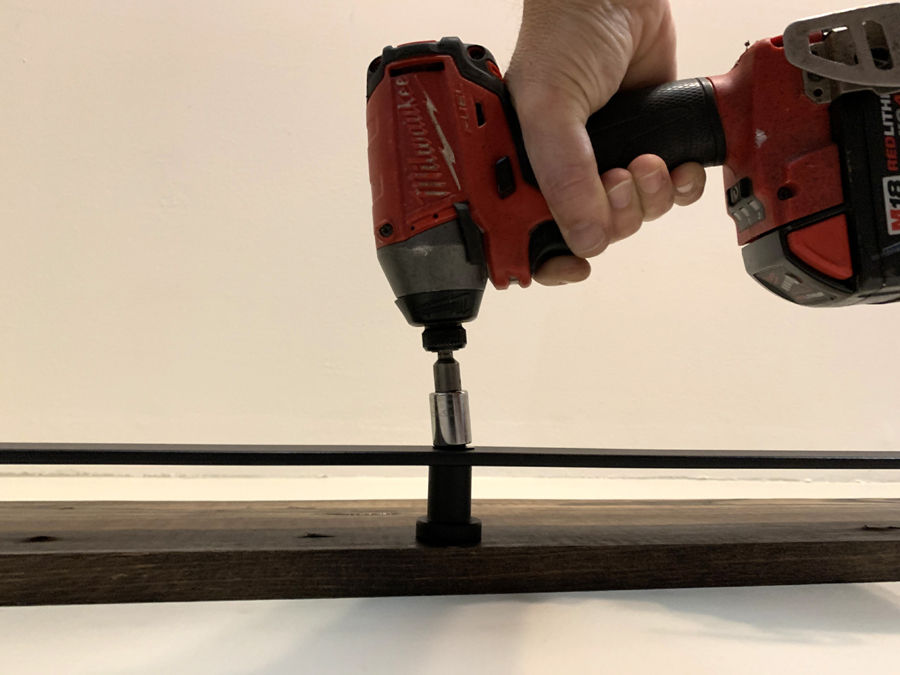
Position the track with its mounting holes aligned with the pencil line. Mark all fastener locations. Drill pilot holes holes with a 1/4-in. drill bit (for concrete walls, use a 3/8-in. concrete bit).
Slide the door stoppers onto the end of each track but leave them loose without tightening their screws. Once tightened, these hard rubber blocks will prevent the door from running off the track.

The track is installed with three-piece fasteners that include long lag screws, washers, and rubber spacers (plus a hollow wall anchor, if necessary). When mounted, the track is clamped between the washers and spacers to hold it away from the wall and provide clearance for the wheeled hangers.

To hang the track, loosely attach one end and let the other end hang down. Then, swing the track up and attach the other end.

Finally, fill in the middle holes. Tighten all the lag screws.
Installing the Door
Attach the kit’s hangers to your door top. On the door shown, we drilled 7/16-in. holes through the door for the hanger bolts. Pay close attention to the instructions included with your kit, because measurements will vary among products and manufacturers. For example, these hangers required holes driven at 1-9/16 in. and 3-9/16 in. from the top.

Fasten the bolts with nuts and washers.

Hanging the door is a simple procedure; just align the center groove of the hanger wheels with the track. The weight of the door might make lifting it in place a challenge, however, so enlist help accordingly.

The kit shown included anti-jump pads that screw to the top of the door to keep it from extending too far.

The last step was screwing a simple bracket (included) to the floor, which serves as a floor guide and prevents the door from swinging out from the wall. Tighten the stop blocks according to where you want the door to travel along the track, and that’s all there is to a DIY barn-door upgrade

A simple trim package around the doorway gives the installation a finished look.
New Life for an Old Door

A good friend of ours who was remodeling an old house had planned to dispose of this funky 70s-era door with huge wood florets. We had other plans and talked him out of it. My wife Shanna stripped off the old lime-colored paint, expecting to reclaim it with a new “faux antique” finish, but she never got that far. By the time the old coatings had been stripped, scraped and sanded, the resulting wood surface had so much rugged character she decided to preserve it “as is” to complement the rustic décor of the kitchen where it would live. After a light coat of stain and a few coats of matte polyurethane, the door had exactly the look the space needed. - M. Weber


Get Creative
Doors mounted with this type of track hardware don't need to fit within the confines of a door jamb. This means the track can be used to mount any sort of door... even one you create in your workshop. Cabinet doors are another popular application for track hardware.


https://ball88.space/ mình ghé thử cho biết vì thấy bạn bè nói qua, không kỳ vọng gì nhiều. Vào cái là thấy giao diện kiểu tối giản, nhìn “gọn gàng” thật, tập trung vào phần sảnh/lobby nên các khối nội dung hiện ra rõ ràng, không bị rối mắt. Mình cũng thấy họ có nhắc chuyện truy cập khi bị chặn mạng, có đoạn nói tới VPN 1.1.1.1 nên ai hay gặp lỗi chắc đọc sẽ dễ hình dung hơn. Lướt xuống thì thông tin chia theo từng cụm, tiêu đề đặt khá to và dễ nhìn nên không phải mò lâu mới biết đang ở mục nào. Nói chung cảm giác giống trang tổng hợp, kéo một chút là nắm…
Ball88 hôm bữa mình cũng tò mò bấm vào coi thử chứ không có chơi gì nhiều. Vừa vào là thấy giao diện nhìn khá sáng sủa, kiểu bố cục thoáng nên mắt không bị mỏi. Mình thích nhất là họ chia nội dung theo từng khối rõ ràng, lướt xuống là hiểu ngay đang xem phần nào, không bị lẫn lộn. Menu đặt ngay chỗ dễ thấy nên chuyển qua lại mấy mục cũng nhanh, không phải mò lâu. Chữ với khoảng cách dòng vừa phải nên đọc lướt vẫn nắm được ý, cảm giác làm gọn gàng chứ không nhồi nhét. Nói chung vào xem vài phút là quen tay liền, nhất là cách họ gom các mục…
trang chủ F8BET mình vừa ghé qua vì thấy group chat nhắc hoài, kiểu vào xem thử giao diện có dễ dùng không thôi. Cảm giác đầu tiên là trang bố trí khá gọn, các khối nội dung tách rõ nên lướt nhanh vẫn nắm được ý chính, không bị rối mắt. Mình có liếc phần giới thiệu thấy họ có nhắc giấy phép Isle of Man nên đọc cũng đỡ lăn tăn hơn chút, ít nhất là họ để thông tin này ngay chỗ dễ thấy chứ không giấu sâu. Thanh menu đặt ngay trên, bấm qua lại mượt, không phải mò từng mục. Nói chung mình chỉ xem vài phút mà vẫn thấy ổn vì tiêu đề và…
hitclub hôm bữa mình thấy mấy đứa bạn nhắc nên tiện tay vào coi thử thôi. Mình không rành mấy trò này, chủ yếu xem trang có dễ đọc không với thông tin có rõ ràng không. Vào cái là thấy họ chia nội dung theo từng khối nhìn khá thoáng, kéo xuống không bị rối mắt, mấy mục quan trọng nằm ngay trên nên bấm qua lại cũng nhanh. Có một đoạn nói về kiểm định RNG mình đọc lướt mà vẫn hiểu ý, họ ghi rõ là có chứng chỉ iTech Labs với GLI nên cảm giác minh bạch hơn chút. Mình cũng thích kiểu họ làm mấy ô thông tin tách riêng, nhìn phát biết đang nói…
luckywin.poker bữa thấy group chat nhắc hoài nên mình cũng bấm vào coi thử cho biết. Vào trang cái là thấy load khá lẹ, kéo trên điện thoại vẫn mượt, chữ không bị bé tí hay lệch khung. Mình không có đăng ký hay chơi gì đâu, chỉ lướt phần giới thiệu với mấy mục thông tin thôi. Thấy họ có nhắc đến bảo mật kiểu SSL 256-bit với xác thực OTP nên đọc qua cũng yên tâm hơn chút, ít nhất là họ nói rõ chứ không kiểu chung chung. Cách trình bày nhìn khá thoáng, chia từng khối nội dung nên lướt xuống là biết đang ở đoạn nào. Menu đặt ngay chỗ dễ thấy, bấm qua lại…