
Ceiling Fan Installation, Step by Step
- Matt Weber

- Jul 21, 2023
- 7 min read
Updated: Sep 4, 2023

Ceiling fans improve airflow, provide a cooling breeze to a stuffy room, and I don't understand how some people fall asleep without them.
During a recent ceiling remodel, the existing fan was ruled stylistically "out of date" and scheduled for replacement. We upgraded with a Casa Vieja Terrazzo model from Lamps PLUS, which has a sleek, contemporary look, a dimmable light and remote-control operation.
Remove the Old Fan
Obligatory safety note: When working on a ceiling fan or any hard-wired electrical appliance, turn off its power at the breaker box. Test the wires to ensure the power is off, then secure the breaker box while you're working.
You'll probably need a ladder to do this job.
Fans vary greatly by design, so the removal and replacement procedure differs somewhat among models. Yet, they all have commonalities, including a mounting bracket that attaches to the electrical box, and a canopy that encloses the wiring.
Step 1

First step is to remove any bulbs or glassware associated with the fan's light fixture. This prevents accidental breakage, decreases the fan's weight, and makes it a smaller, more manageable package. The glass pieces might be held by retaining screws, or they could be threaded and simply twist off the fan.
Step 2

Next, remove the canopy. These are typically held in place with small Phillips-head screws. The fan shown had four screws. I removed the two fixed screws, then loosened the two screws in the keyhole slots, which allowed me to twist and lower the canopy.
Step 3

Once the wiring is exposed, I suggest that inexperienced DIY'ers snap a photo of the connections for reconnection with the new fan. Separate the wires by removing the wire nuts and untwisting the copper connections within them.
Now, it's time to remove the fan body.
Step 4

The fan shown utilizes a common mounting method for modern fans. The fan has a "hanger ball" at the top of the down-rod, which is a thick projection similar to the head of a nail. The tapered mounting bracket has an open slot on the side.
Step 5

To remove the fan, lift the entire unit so the hanger ball dislodges from its nesting position, allowing you to slip it through the open slot, which frees the fan from the ceiling. You can donate the fan to a local housing charity or toss it into the garbage if it's in bad shape.
But wait! Not all old fans utilize this mounting-bracket method, so be prepared for some deviations. Some older models used a metal hook on the hanger ball that supports the fan's weight by hooking over a metal loop in a ceiling plate. I've also replaced fans that connected to a ceiling bracket using a metal dowel and cotter pin.
Although mounting methods vary, be prepared to carry the full weight of the fan unit once you've freed it of its mounting mechanism. The motor is the heaviest component, and depending on model might require two people to lift it down from the ceiling. You can also remove the fan blades before dismounting to lessen the weight and "shrink" its size. The blades are usually fastened with screws, so simply unscrew them individually.
With the fan out of the way, next step is to unscrew the mounting bracket (or ceiling plate) from the ceiling, then hopefully you're ready for new fan installation!
Hold on. Hit the brakes...
Step 6

Evidently, the last person who installed a fan in this room skipped the following section of the instructions. You, however, should not.
Per electrical code (and common sense), you need a stronger ceiling box to hold a heavy fan in motion than the flimsy plastic one required to hold a simple light fixture. Ever seen a wobbly fan swinging precariously from its ceiling mounting? If mounted to an old plastic box, that wobbly fan's mounting screws are probably in process stripping out of the plastic housing, so you'd better wear a helmet.
Step 7

Since the previous fan installer didn't heed such sound advice, I ventured into the attic to pry loose the old plastic light box from where it was nailed to the ceiling joist. This is a standard requirement when you upgrade from a light fixture to a ceiling fan. If you find yourself doing the same, first cut away any caulk or paint around the box's rim in the ceiling of the room below.
Step 8

A ceiling fan requires a metal ETL-listed mounting box. The fan’s outlet box must be fastened to the house framing (with the appropriate fasteners) to support the moving weight of the fan--at least 50 lbs.
Step 9

The Raco fan box I purchased comes with an L-shaped bracket. To install, fasten the bracket firmly into the framing using wood screws at least 1-1/2 in. long, then bolt the box into the threaded holes of the bracket. Make sure the bottom edge of the box aligns flush with the ceiling.
Note: If your ideal fan location doesn't align next to a ceiling joist, you can install cross-brace 2x blocking between joists from which to hang the box, or use an adjustable metal support bar (see side note).
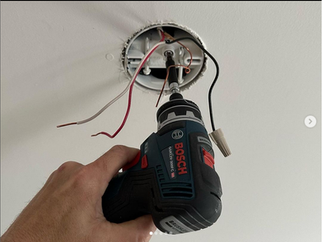
Hang the New Fan
When working on a new fan, most manufacturers recommend using a handheld screwdriver rather than a powered one. This is so you don't misalign any screw threads or strip out a fastener head by using too much torque. While that makes sense, I still use a power driver because it saves time, but I set the tool to its lowest torque setting, and so should you.
Step 10

The replacement fan shown uses a very similar mounting system as the one we removed. First, mount the hanger bracket into the new fan box using the provided hardened metal bolts.
Step 11

Next, assemble the fan components according to the manufacturer’s instructions. I won't spend a great deal of time on the specifics, because assembly will vary somewhat among fan models. All fans will include a hanger mechanism, canopy, down-rod, motor, blades and usually a light.
A fan's down-rod is often sold in optional sizes. The down-rod works double duty to support the fan's weight while also serving as a wire chase for the fan. So, if you have a high ceiling but want your fan to hang 8 feet above the floor, then you can order a longer down-rod to account for ceiling height. The Casa Vieja model shown had the choice of seven down-rod sizes, measuring up to 72 inches to accommodate 16-ft. ceilings.
Step 12

Install the new fan and motor assembly, in this case by hooking the hanger ball into the registration slot of the mounting bracket. With this model, you rotate the hanger ball until the check groove drops into the slot and seats firmly.
Step 13

With the weight supported by the bracket, your hands are now free to make the wiring connections. Always refer to the fan manufacturer’s instructions for specific wiring guidelines. For example, the fan shown included remote-control operation. This required me to connect the remote-control receiver to the wiring. The receiver tucks into the mounting bracket.
Step 14

The wiring procedure will be fairly straightforward: Twist together the stripped ends of the color-matched and ground wires, then secure them with a UL-listed wire nut (and wrap with electrical tape for extra safety). Once wiring is complete, gently push the connections into the electrical box.
Step 15

With all connections complete, cover with the canopy, which usually fastens with screws and conceals all wiring and mounting components. This fan included a stubby screwdriver that makes it easy to tighten the canopy screws situated so closely to the motor.
Step 16

Next comes some key components—the fan blades. A screwdriver is all you need to fasten them in place.
Step 17

Finally, install the light kit. This Casa Vieja model utilizes a dimmable LED light fixture that simply plugs together with a push-fit connection, along with a soft diffuser that screws in place.
Final step

Last step is to reconnect the breaker and turn on the power. In this case, the fan's lighting and three-speed operation can be controlled by wireless remote.
SIDE NOTES
Fan Fact: They Cool People, Not Homes
Although a ceiling fan is a "cooling" device, the operation of its electrical motor actually adds a small degree of heat to the room. Ceiling fans provide evaporative cooling and aid convective cooling, but they're only useful when they move air over someone's skin. If the airflow generated by a fan isn't hitting anyone's skin, it's only making the space warmer with no cooling benefit. So, when no one is in the room, turn off the fan to conserve energy.
What Size Fan Do You Need?
If a room's longest wall is 12′ or less, use a 36″ diameter ceiling fan.
If a room's longest wall is 12′ to 15′, use a 42″ diameter ceiling fan.
Installing a Ceiling Fan Between Joists

To hang a ceiling fan between joists, consider using a Fan Box with Support Bar. Made by companies such as Raco and Westinghouse, they support ceiling fans between structural members safely and securely where access is limited. Engineered for installation during remodeling or new construction, the mounting brace can be installed in finished ceilings through a 4-inch hole. The brace allows easy expansion, adjustable from 16 to 24 inches. The electrical box can be positioned anywhere on the bar to fit your project needs. (Photo © Hubbell Raco)
Installing a Ceiling Fan Over a Joist
If a ceiling joist crosses the spot where you want to hang a light fixture or ceiling fan, you’ll need to use a saddle box instead of a standard electrical box. The saddle box is shaped with an indention that wraps around the joist but still provides the code-required wire housing of a junction box.

For ceiling fans, the junction box should usually be made of metal to ensure a firm thread connection with the fan’s mounting bolts. With a saddle box, however, the fan will be installed with screws driven through the box and into the joist, rather than fastened to the box with bolts.


#ceilingfan #ceilingfaninstallation #faninstallation #howto #saddlebox #ceilingfans #ceilingfan #lightfixture #lightfixtures #install #tipsandtricks #howto #handyman #construction #homedecor #homeimprovement #homeimprovements #diyhomeprojects #diyhomeimprovement #diyhomedecor #homemaintenance #propertymanagement #realestate


Electrician Singapore offers certified electricians who specialize in ceiling fan installations and other electrical services. They’re available 24/7 and provide upfront pricing—so you know exactly what to expect with no hidden costs. Whether it’s a new installation or replacing an old fan, you can count on their experience and professionalism.
AV在线看 AV在线看;
自拍流出 自拍流出;
国产视频 国产视频;
日本无码 日本无码;
动漫肉番 动漫肉番;
吃瓜专区 吃瓜专区;
SM调教 SM调教;
ASMR ASMR;
国产探花 国产探花;
强奸乱伦 强奸乱伦;