
Concealment Shelves that Look Like Timber Mantles
- Matt Weber

- Oct 21, 2025
- 8 min read
Updated: Oct 27, 2025
by Matt Weber

Here is one “how to” story you will only find at Home Improvement & Repairs because it features my own personal design for building rustic concealment shelves.
I love creative construction like hidden doors, secret passages, and concealed spaces. One popular item in my neck of the woods is a “concealment shelf,” which is a wall shelf that
contains a small storage compartment to hide your secret candy stash, priceless jewelry, deadly weapons, classified documents, top secret microfiche, or anything else that will fit.
However, concealment shelves have grown so popular that they are now mass produced and marketed with internet advertisements. It strikes me that the problem with promoting the same model concealment shelf to everyone on the internet is that it will become easily recognizable by many people. If everyone recognizes your shelf as “one of those shelves that hides things” then its purpose has been defeated.
The shelves available for purchase usually feature classic cabinet-type construction which looks unnecessarily boxy for the style of shelf (because it hides a storage box). Furthermore, upon close inspection, certain models even have visible seams where the storage compartment opens. This might be a dead giveaway to anyone snooping around.
My Solution
I wanted a shelf that nobody would ever suspect hid anything, and one with no visible seam to give away the storage compartment.


I was already familiar with how to make rustic floating mantles that mimic the look of solid
timber beams, so I modified the “faux beam” design. I invented an internal hidden storage compartment which would replace the mounting bracket of the floating mantle. By replacing the hidden bracket with the compartment, the only “seam” would be the unavoidable joint between the mantle and the wall.
It took me many attempts of trial and error to determine the correct measurements for a shelf that would fit easily inside the mantles, maintain structural integrity and carrying capacity, and could be securely mounted against a stud wall. At last, I arrived at a successful design and applied it to three shelf sizes that fit 4x8, 4x10 and 6x10 floating mantles.
People seemed to like the concept. I used to make these as custom orders and ship them to states across the U.S.A. I am now ready to share the building plans with the fine readers and woodworkers of this magazine.
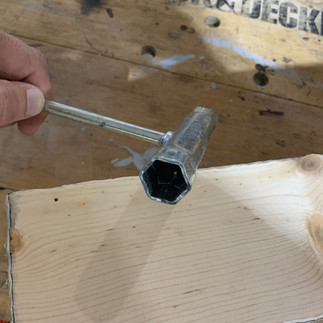
Note that this is a moderately challenging carpentry project but not beyond the reach of a skilled DIY woodworker. It does, however, require a table saw to rip the boards to size. Other useful tools include a dado set for the table saw, a miter saw, a finish nail gun, and a drill-driver.
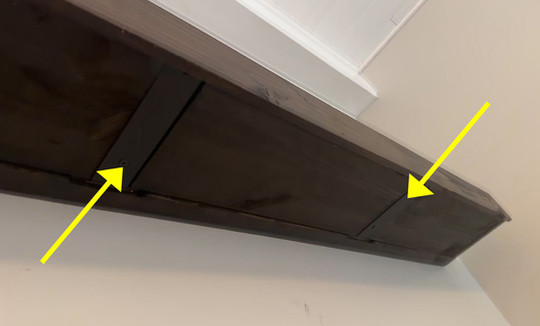
The Rustic Mantle
The visible shelf to this project is a “faux beam” style often used for mantles. This mantle is essentially a five-sided rectangular box built from 1x lumber in which the boards’ seams are beveled at 45 degrees to help conceal the edge joints.
I recommend using a softwood species such as pine to make it easier to distress the wood for a rustic style, which helps to hide its construction and give it a convincing solid-beam appearance. Choose straight, flat boards without bows or warps. The boards are joined along the beveled edges with finish nails and wood glue, and we provide a detailed tutorial on building the rustic mantles on our blog. Be sure to maintain at least 2-3/16 inches between the top and bottom mantle boards for easy functionality of the hidden shelves.
I recommend building the mantle at least 22 inches long, because the hidden shelves
are designed to be mounted into two wall studs. A 22-inch mantle allows the inner shelf to be built long enough to cross the studs.


The “faux beam” mantles that conceal our shelves are built from pine and finished with a highly distressed, textured appearance to help conceal the carpentry and look like solid timber. Read our step-by-step tutorial on building the mantles.
The convincing nature of this project relies a great deal on the construction and finishing
of the rustic mantle. Use clamps to assemble very tight joints to look like believable “solid” corners. Use a variety of tools such as pipes, hammers and screwdriver shanks to close the wood fibers around all seams and joints. Use a stainable wood filler for any remaining gaps and to conceal nail holes. Chains, nuts and washers can be used to impact the surface
to impart random, variegated texture for a weathered timber appearance.


Important: Note that the rear of the mantle box that faces the wall is left hollow with no board enclosing it. For better shelf functionality, I recommend cutting a 45-degree bevel along the rear edge of the bottom board. Do not, however, cut a bevel on the rear edge of the top board, because the top edge must remain square to interlock the mantle and hidden shelf with a Velcro strip. The bevel on the bottom board allows easier interface with the interior shelf whenever enclosing it.
Hidden Shelf to Fit 4X Mantles
Refer to the labeled photos for the specific cut sizes of the hidden shelf components. I do not recommend altering the height or depth of the shelves. The measurements are intended to maximize storage space inside a 4x8 or 4x10 mantle.

Note that for all hidden shelves, the lengths may vary, but I recommend keeping the shelves at least 1-1/2 inches shorter than the interior dimensions of the mantle to ensure an easy fit.
To ensure a sturdy storage shelf, you need a strong frame, a reliable shelf floor that will not detach when weight is applied, and secure mounting to the wall.
Essentially, the hidden shelves consist of a rear mounting board, two side boards, a plywood floor, plus a thinner non-structural board at the front.


The side boards mount to each end the rear board with half-lap joints. This type of
woodworking joint provides a large surface area for glue and fasteners. I cut the joints
on a table saw using a dado set, but you can also cut them with a table saw blade
or router by carefully marking the center of the board, adjusting the blade height, and
making successive cuts to remove the wood.
Apply high-quality wood glue to all mating surfaces of the joint and fasten with countersunk screws from the top of the side boards.
I also recommend driving a Fine Screw (thin trim screw) from the sides into the rear board to strengthen the connection. This glue-fortified, cross-grain fastening method is substantially stronger than driving screws into the end-grain of a board.
Use clamps to keep the frame flat and square as the glue dries.


Once the frame has dried, a rectangular plywood floor (1/4 inch thick) should be cut
to fit flush with the sides and rear board. Fasten it to the bottom of the frame with glue and screws.
Next, the front board should be cut large enough to fit flush over the shelf, concealing the fronts of the side-boards as well as the edge of the floor.
Before assembling the shelf, apply your choice of wood stain to all components.


Attach the floor to the shelf frame by applying wood glue along all points of contact and driving 1-inch drywall screws through the plywood every 6 to 8 inches.
Do not attach the front board of the hidden shelf until it has been mounted to a wall.
Longer shelves, 36 to 46 inches, should be built with a center cross-rail to maintain structural integrity. This middle cross-rail is made from the same board stock as the sides but is cut square on each end to fit flush between the rear and front boards.
When adding any internal cross-rails, I recommend countersinking a 5- to 6-inch
screw (depending on shelf depth) through the back rail and down the length of the cross-rail. Apply high-quality wood glue to all joints when assembling and screw it from below.
Also, note that the cross-rail does not have to be located in the exact center of the shelf.

It’s a good idea to hold the shelf against the wall at its mounting location to mark the studs on the shelf. The location of the cross-rail can be adjusted to the left or right to avoid interfering with mounting the shelf into the studs.

Hidden Shelf to Fit 6X10 Mantles
After designing shelves for 4X mantles, I got ambitious. What if I wanted to hide something larger?
Refer to the labeled photos for specific cut sizes of the hidden shelf components of
my largest design—the 6x10. The basics of construction remain essentially the same, only built with larger boards and larger fasteners.

However, I was determined to eliminate the center divider with this larger model, yet I needed to maintain even more carrying capacity than with the smaller ones.
My solution came in the form of right-angle metal brackets. Instead of a center divider, I installed two 6-inch, L-shaped brackets to strengthen the shelf. These brackets were
mortised into the rear board and helped to support the floor (which was made from 1/2-inch solid wood).

I traced the shape of their mounting flanges against the rear board and used a router to cut the mortises. This can also be accomplished with the careful use of a wood chisel. The brackets are screwed onto the rear shelf board when the floor is installed. A pair of
these metal brackets are rated for a 100-pound load capacity. The floor should also
be fastened at the ends by driving predrilled finish nails through the sides and into the
edge of the 1/2-inch board.


Mounting the Shelves
Use a stud finder to locate and mark the wall studs at the height and location where
you want to hang the shelf. Note: You should mount the hidden shelf 3/4 inch lower than
the final height of your mantle shelf.


Align the hidden shelf against the wall and mark the stud locations on its rear board.
With the shelf on your workbench, pre-drill and start the mounting screws at the stud locations but do not yet drill them through the rear board. To mount the shelves, I recommend using structural construction screws at each stud location; 4-inch screws for the 4X shelves, and 5-inch screws for the 6X10 shelf.


Align the shelf against the wall and drive one screw through the rear and into a stud (not too tightly yet).
Level the shelf then drive in the remaining screws into the studs, snugging the shelf tightly against the wall.
Drive a screw through each end of the front board, fastening it to the ends of the side boards. The front should cover the edge of the floor.


Apply mating adhesive Velcro inside the center of the mantle top and along the top of the rear shelf board. Limit the Velcro strips to about one-fourth the length of the rear board; otherwise it may be difficult to separate the mantle from the hidden shelf.
The Velcro completes the installation, and the mantle can now be placed over the shelf to conceal it.
To access the hidden shelf, lift the mantle at one corner to detach the Velcro strips. Pull the mantle away from the wall and set it aside to access the hidden shelf.


SIDE NOTE
Optional Upgrade
Building the box-type mantle shelves is a common woodworking design, but I have never been satisfied with enclosing the ends with a cutoff board. A solid beam of timber would have circular tree rings on its ends, not the linear grain of a board. To really sell the look of a solid beam that “nobody would ever suspect” conceals an interior shelf, I carve circular tree rings into the boards that enclose my rustic shelves, then stain everything to match. This method is particularly convincing when working with dark stains.
Back when I was making and selling these mantles to customers, I devised a circular carving tool from a modified orbital sander to carve the “tree rings” into the end caps. A DIY’er can accomplish a similar wood-grain pattern using a sharp carving tool and circle-shaped guides of varying sizes.


kuatoto | kuatoto | kuatoto | kuatoto | kuatoto | kuatoto | kuatoto | kuatoto |
toto slot | toto slot | toto slot | toto slot | toto slot | toto slot | toto slot | toto slot |
toto togel | toto togel | toto togel | toto togel | toto togel | toto togel | toto togel |
kuatoto | kuatoto | kuatoto | kuatoto | kuatoto | kuatoto | kuatoto | kuatoto |
toto slot | toto slot | toto slot | toto slot | toto slot | toto slot | toto slot | toto slot |
toto togel | toto togel | toto togel | toto togel | toto togel | toto togel | toto togel |
kuatoto | kuatoto | kuatoto | kuatoto | kuatoto | kuatoto | kuatoto | kuatoto |
toto slot | toto slot | toto slot | toto slot | toto slot | toto slot | toto slot | toto slot |
toto togel | toto togel | toto togel | toto togel | toto togel | toto togel | toto togel |
kuatoto | kuatoto | kuatoto | kuatoto | kuatoto | kuatoto |…
kuatoto | kuatoto | kuatoto | kuatoto | kuatoto | kuatoto | kuatoto | kuatoto |
toto slot | toto slot | toto slot | toto slot | toto slot | toto slot | toto slot | toto slot |
toto togel | toto togel | toto togel | toto togel | toto togel | toto togel | toto togel |
kuatoto | kuatoto | kuatoto | kuatoto | kuatoto | kuatoto | kuatoto | kuatoto |
toto slot | toto slot | toto slot | toto slot | toto slot | toto slot | toto slot |
toto togel | toto togel | toto togel | toto togel | toto togel | toto togel | toto togel |
kuatoto | kuatoto | kuatoto | kuatoto | kuatoto | kuatoto | kuatoto | kuatoto |
toto slot | toto slot | toto slot | toto slot | toto slot | toto slot | toto slot | toto slot |
toto togel | toto togel | toto togel | toto togel | toto togel | toto togel | toto togel |
kuatoto | kuatoto | kuatoto | kuatoto | kuatoto | kuatoto | kuatoto | kuatoto |
A magician is more than a performer; they are a creator of wonder and joy. With every illusion, they invite audiences into a world where the impossible becomes possible. From dazzling card tricks to mind-bending illusions, magicians captivate people of all ages. In special events, such as weddings, their presence adds unforgettable charm. A wedding magician Sydney couples often hire transforms ordinary moments into magical memories, leaving guests amazed and entertained. Whether performing on stage or mingling with the crowd, magicians remind us that imagination still holds power, and a touch of magic can make any celebration extraordinary.
India is famous for dairy farming, being Click here the world's largest milk producer for decades, with a vast cattle population and deep-rooted cultural importance. Other prominent dairy farming countries include the United States, China, Germany, and France, known for their high production volumes and significant contributions to the global dairy market.