
Create a Kitchen Island from Cabinets
- Matt Weber

- Sep 20, 2023
- 7 min read
Updated: Sep 21, 2023

Darin and Judy Epperson had a vision for their kitchen. Their home in Gulf Shores, Alabama, was to be remodeled with white cabinetry in the shaker style of construction. They also wanted a kitchen island to match but could not find one that offered the style, size, and amenities they envisioned. But that didn’t stop Darin from bringing his vision to life.
Combining Cabinetry
Rather than settle for a stock island that he didn’t love, Darin decided to expand on what was available. Home centers sell cabinet modules in stock sizes and trimmed in the same shaker style as the Epperson’s new cabinets. These modules are available in a variety of configurations; some with full-height doors, others with drawers and ball-bearing glides, and some with large pot-and-pan drawers, enabling all sorts of combinations. This provides a home-owner the opportunity to choose exactly the storage accessories they need to fit their lifestyle and cooking needs.
Darin fastened together three separate cabinet bases plus a wall cabinet (for the tall doors) to form a large rectangular foundation for the kitchen island.
“The hardest part of the project was integrating the parts of the cabinet to look like a single unit,” notes Darin.
To connect the cases, he used 2x4 blocking where necessary to keep the outer edges of the cabinets aligned. The assembled island base featured a variety of drawers and doors, and—with a little creative carpentry—would even provide a home for a microwave oven.

Darin Epperson fastened together four separate cabinet modules to form a single island base.
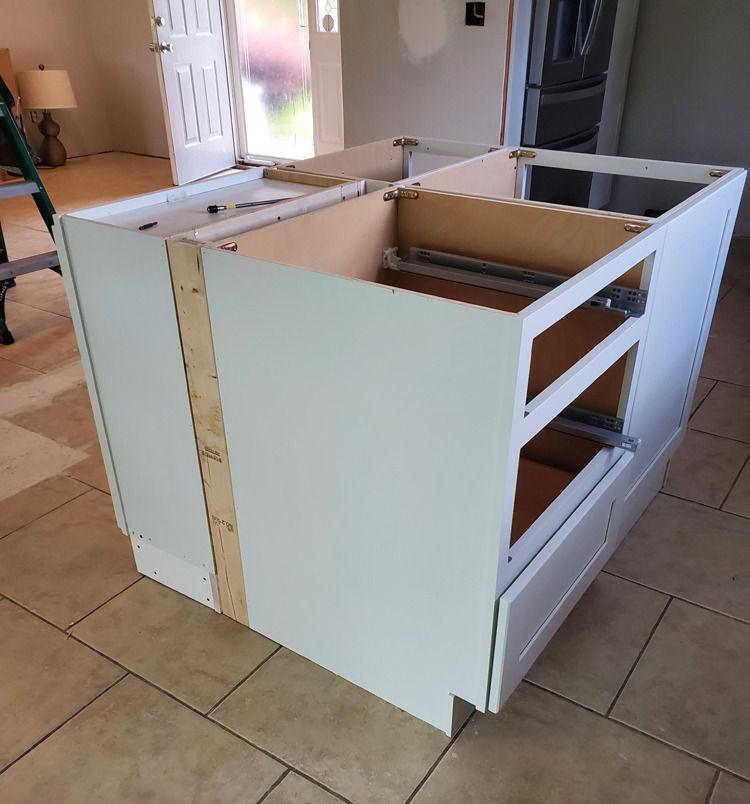
Blocking made from 2x4 lumber was integrated where necessary to maintain alignment of the cabinet edges.
Table Extension
The next phase of the project required extending the top of the cabinet base to create a table supported by two 4x4 legs. The table area that topped the cabinet base would serve as a food-prep station. Darin constructed the extension long enough to bridge two side-by-side chairs, so the surface could double as a dining-room table.
It’s important to note that the plywood walls of a cabinet base, typically ½- to ¾-in. thick, don’t have much bearing strength by themselves. Any sort of table extension should be supported by 2x4 blocking securely fastened to the base to provide a nailing surface and help carry the load of the table. To make the connection, Darin fastened horizontal 2x4 blocking flush with the top of the cabinet base. The 2x4 serves as a ledger board to carry two parallel 2x4 joists that support the table top. The ends of the joists terminate against the 4x4 legs where they’re screwed into another horizontal 2x4 that bridges between the posts and joists to maintain squareness of the table.
Within the rectangular frame of the table extension, Darin incorporated diagonal blocking to strengthen each corner. He bridged the side joists with three evenly spaced 2x4s to keep the table frame rock-solid and provide support for the quartz slab that was destined to serve as the table top.

A 2x4 ledger screwed to the island base supports one end of a table-top extension.

The opposite end of the extension is built from two 4x4 legs and a 2x4 rim joist.

The table surface is supported by two parallel 2x4 joists. Diagonal blocking strengthens each corner, and three evenly spaced 2x4s bridge the joists to keep the frame square and solid.
Trim Detail
With the table frame complete, Darin’s next move was to wrap the structure in trim that matched the cabinets. Shaker style trim consists of simple face-frames and flat boards with square edges to accentuate transitions and provide shadow lines. When properly installed, a shaker-style cabinet package provides a clean, classic look that has been popular for ages.
By duplicating the trim sizes and reveal measurements that were built into the cabinets, Darin was able to cover his self-made table frame with a shaker package that matched perfectly with the surrounding décor of the kitchen.

Next step is to wrap the frame in matching trim.
For shaker trim, home centers typically sell pre-primed trim boards in a variety of stock sizes made from both solid wood and medium-density fiberboard (MDF). When installing the trim boards, be careful to keep all mating faces completely flush and all joints square to achieve the desired effect. Install the components with glue and finish nails, so the small nail-heads can be filled and sanded flush with the wood surface. All joints should be sealed with a quality paintable caulk so the trim can be painted to achieve the seamless appearance and clean look of the shaker style.

The shaker style trim of the new kitchen cabinets provided the stylistic model for the matching kitchen island.

Shaker style trim uses flat boards and face-frames with square edges to accentuate transitions and provide shadow lines.
Integrating the Electrical
The quartz countertop for the Epperson’s countertop was delayed by back-order, but Darin used the wait time to install electrical supply lines in the kitchen island. This provided a handy 120-volt outlet on the kitchen-counter side of the cabinet base.
He also removed one of the cabinet drawers and altered its face-frame to house a compact microwave oven, which was installed just beneath the island top.

By adding a power supply and applying some creative carpentry to one of the cabinets, the Eppersons were able to incorporate a microwave oven into the island.
Installation of the Island Top
Installation of large stone slabs is usually left to the professionals due to the specialized equipment required to cut, shape and transport the hard, brittle material. In fact, many experienced remodeling contractors shy away from stone countertops because the weight and rigidity of the material requires extreme care to avoid damaging a slab. If the contractor accidentally breaks a customer’s slab, they’ll have to replace it, and the high cost of the expensive material can kill their profit margin.
Pro installers use trucks equipped with special padded racks that isolate and secure the slabs to minimize vibration on the road. Special carts with rubber tires and other types of handling equipment are used to move the slabs around the job site.

The island’s quartz table top is stain-resistant, maintenance-free, and won’t absorb moisture.
The Eppersons selected a quartz table top because the surface is stain-resistant and, unlike granite, maintenance-free. Quartz won’t absorb moisture from raw or leftover food, which can harbor harmful bacteria. Quartz surfaces are also more durable than granite, resist chipping and scratching, and usually offer a stronger product warranty.
After the quartz was installed, the top of the Eppersons’ island made a perfect match to their kitchen countertops.
One of the main reasons that quartz has grown so popular is due to appearance, which has the look of stone while also allowing homeowners to customize the design. Although granite offers many options in terms of appearance, it’s a natural material, so you may have to search for the right piece to match your color scheme. Quartz is not 100 percent natural. Instead, quartz countertops are manufactured using 95 percent ground natural quartz and 5 percent polymer resins. Since quartz is engineered, the selection process is easier.
Furthermore, quartz is easy to maintain. All countertops should be cleaned daily with soap and water, but that’s about it in terms of maintenance for a quartz countertop. Unsealed granite countertops can be stained by certain oils and acids, so it’s best to reseal a granite top once a year. Although quartz is more expensive than granite, its solid surface means there is no need to have your countertops resealed.

Here’s the finished project once the kitchen remodel was complete.
Dining In
Once completed, the Epperson’s kitchen island integrated beautifully into the overall décor of the home. With its matching hardware and trim, the project made a perfect match to the new shaker-style kitchen cabinets.
When the home center doesn’t carry what you want, DIY homeowners can take a cue from Darin’s approach by thinking outside the box—or outside the “big box store”—and putting a new, creative spin on stock items. With a little ingenuity, some know-how, and a clear vision in mind, you can make exactly what you want, even if you can’t purchase it from a store.

SIDE NOTE 1
Want to Build an Island from the Ground Up?
Kitchen Remodeling: Gas or Electric?
Gas appliances have long reigned as the supreme cooking method. Hailed by professionals and home chefs alike, a gas stove or range offers immediately responsive heat control, even heat distribution, and the cooking can continue unaffected by power outages.
Research suggests, however, that living with a gas appliance has led to increased risks of asthma and other illnesses due to air pollutants like nitrogen dioxide and methane. And the emissions occur even when the appliance is not active. According to reports, more than three-quarters of emissions happen while the appliance is not in use.
Those same pollutants have been deemed harmful to the environment. For that reason, some cities are now banning new gas hookups for appliances to reduce air pollution and emissions to help in “fighting climate change.”
A ban on gas appliances has already been instated in New York City, where new buildings under seven stories cannot have gas hookups starting in 2023. The ban on taller buildings will go into effect in 2027. In fact, the State of New York is considering a version of this ban in 2027, as well. The San Francisco Bay Area has already had a similar ban in place for the past year.
Although avid chefs tend to prefer the performance of a gas range and oven, electric appliances do offer some attractive advantages to homeowners. Namely, electric appliances are safe, easy to clean, and will make any kitchen renovation easier by eliminating installation of the gas supply.
When selecting an appliance, you should weigh the advantages and disadvantages of each system. Your love of cooking might trump your concerns about gas-appliance emissions—after all, American homes have been cooking with gas for generations. Keep in mind, however, that as far as the government regulators are concerned, they intend for electric appliances to be the way of the future.


Home fragrances can change the atmosphere of a room almost instantly. I came across scentiment when looking for scented candles and decorative aroma products. The brand emphasizes mood and ambiance rather than just fragrance names. Selecting a scent based on how you want your space to feel adds a more intentional touch to decorating. For people who enjoy creating a cozy environment, fragrance focused brands often become part of their routine.
Such creativity and craftsmanship are truly inspiring! Darin’s approach to building a custom island shows how design and practicality can come together beautifully. As a Los Angeles Kitchen Remodeler, I’ve seen how personalized cabinetry projects like this can completely transform a kitchen, making it both functional and unique to the homeowner’s vision.
Click here provide members with discounts on over-the-counter medications, vitamins, and health essentials, promoting better health management and cost-effective wellness solutions. kaiserotcbenefits.com - more details here
Click here help you find recent death notices, providing information about funeral services, memorials, and tributes for loved ones in your area. obituariesnearme.com - more details here
Click here? Many users have had mixed experiences with the platform, so it's important to read reviews and verify deals before booking. istravelurolegit.com - more details here
AV在线看 AV在线看;
自拍流出 自拍流出;
国产视频 国产视频;
日本无码 日本无码;
动漫肉番 动漫肉番;
吃瓜专区 吃瓜专区;
SM调教 SM调教;
ASMR ASMR;
国产探花 国产探花;
强奸乱伦 强奸乱伦;