
Under-Deck Drainage Installation
- Matt Weber

- Dec 23, 2025
- 4 min read

If you’re building or refreshing a second-story deck, one of the smartest upgrades you can add is an under-deck drainage system. Not only does it protect your deck from moisture damage, but it also lets you turn the space underneath into something usable – whether that’s extra storage, a cozy patio or a fully outfitted entertainment zone. With a drainage system in place, your deck becomes a multi-level extension of your home.
A dry under-deck area isn’t just convenient, it also helps extend the life of your deck by keeping the frame protected from moisture that can lead to rot and decay. Once the space is waterproofed, you can safely add lighting, ceiling materials, fans and more without worrying about exposure to the elements.
The systems shown in this article, the Trex RainEscape system is designed with DIY’ers in mind. Using a network of troughs and downspouts, the system moves water away from the deck framing and into your gutter system. The result: a dry, protected space beneath your deck and a stronger structure overall.

Following is everything you need to know to install the system yourself:
How The System Works
Before getting started, it helps to understand what makes the Trex RainEscape system different. Many drainage systems install below the joists that support the deck’s surface. This leaves the joists vulnerable to water and other debris that falls through the deck boards. Trex RainEscape installs above the joists before any decking goes down.
This approach offers two big advantages: better protection and a completely dry space. Water never touches the joists, helping prevent rot and long-term damage. Because moisture never gets below the deck surface, the area underneath can be finished like an outdoor room.
The system itself is simple: downspouts catch water from each joist bay, troughs direct the water toward the gutter and butyl tape seals everything for a waterproof finish.

Tools & Materials You’ll Need
In addition to the system itself, you will need the following tools:
Utility knife or scissors
Staple gun with standard staples
Caulk gun
Nails or screws for keeping troughs aligned
Step-By-Step Installation
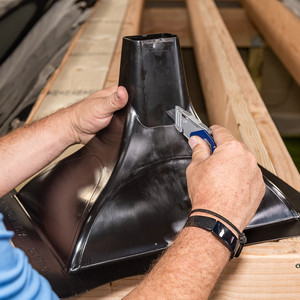
Step 1: Install the Downspouts
Start by installing the downspouts, which move water from each joist bay into the gutter system. Cut along the pre-scored lines to match the joist spacing (usually 12” or 16" on center). Position each downspout along the rim joist or ledger board, cutting away the side facing the open bay. Ensure the downspout extends about one inch into the gutter — this guarantees a positive flow path for runoff.
Pro Tip: Install the downspouts before any troughs or decking to maintain proper alignment and flow direction.


Step 2: Install the Trough Material
The troughs carry water from the joists down to the downspouts.
Place the trough with the smooth, shiny side facing up. Lay the material across the joists, keeping it smooth and free of wrinkles. Each bay gets one continuous piece – don’t overlap the troughs.Staple the material into the joists, rim joists or headers (never into the decking surface or non-structural areas).
Make sure the trough slopes gently toward the gutter end about 1/4” per foot, which is enough to help water drain.

Step 3: Repeat Across All Joist Bays
Continue the process bay by bay. Work methodically to maintain alignment, especially on wider decks where visual continuity matters.
A good practice is to install a mid-span nail underneath each joist to help hold the trough straight and taut during installation. This keeps the channel open, prevents sagging and helps avoid pooling water.

Step 4: Seal with Butyl Tape
Once the troughs and downspouts are in place, seal everything with butyl tape to ensure the system is fully waterproofed. This includes all seams, all staple holes, and any nail or screw penetrations. Make sure surfaces are clean and dry so the tape sticks well.
Pro Tip: Press the tape firmly to remove air bubbles and ensure a tight, waterproof bond.
Step 5: Test the System
Before installing deck boards, test your setup. Confirm that each trough has a consistent slope. Pour a little water into a few bays to ensure proper flow and smooth drainage. Make any needed adjustments before the decking goes down.
Step 6: Install Decking
When it’s time to install your deck boards, avoid using any fasteners that could puncture the drainage membrane. Use flat-based clips or screws, and do not use nails.
Pro Tip: Don’t over-drive the screws, because over-tightening can damage both the fastener and the waterproof layer below.
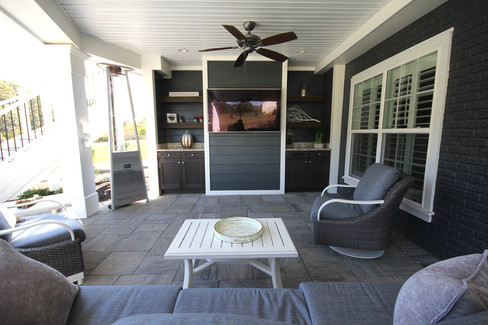
Step 7: Finish the Under-Deck Space
Once your drainage system and decking are installed, the space below is ready for whatever you want to create.
Popular DIY options include a finished ceiling, recessed soffit lighting, ceiling fans, weather-protected storage, a TV or entertainment setup, or even a covered patio or lounge.
Dos And Don’ts for Success
Do:
Keep the joists straight, clean and aligned.
Ensure every bay drains into a gutter outlet every 12–14 feet.
Tape all seams, fastener holes and overlaps.
Don’t:
Staple through non-structural members.
Allow debris or water to remain under the tape.
Use nails or spiked fasteners.
Forget to verify the slope and water flow before installing decking.
Small details make a big difference in long-term performance.
A Smart Investment
Installing an under-deck drainage system may add an extra step to your deck-building project, but the benefits are well worth it: You protect your deck’s frame from moisture and rot. You gain valuable, usable space beneath your deck. You unlock the ability to finish the area with lights, ceiling fans and more. And, you increase your home’s overall value and versatility.
With the RainEscape system, you’re not just building a deck, you’re creating a year-round outdoor space your whole household can enjoy.


--
For more, visit TrexRainEscape.com.


Comments