
Decked Out with a Drink Rail
- Matt Weber

- Sep 26, 2022
- 4 min read

The new wraparound deck at Martinez home in Hoover, Alabama, makes a great place to relax and entertain guests. When it came time to design the deck’s railing system, a drink rail was a natural fit.

To build any sort of guardrail system for a deck, you must start with a strong post foundation. Pressure-treated 4x4 posts are often used as the “bones” of the system, whether they’re
left uncovered or they serve as a core post for decorative sleeves made of vinyl or composite material.

For a strong post connection, HIR recommends fastening the post bottom within the deck frame perimeter using two 1/2-inch galvanized through-bolts with washers driven through the joist framing and the full thickness of the post.

To bolster this connection, you can opt for a post-to-deck metal bracket, such as that
manufactured by Simpson Strong-Tie or DeckLok. These metal brackets fasten to
the through-bolts and connect flush to an adjacent framing member with galvanized screws.
If the posts don’t line up next to an adjacent joist, then you may have to install blocking to provide a fastening surface. Using the metal brackets takes a little more time, money and effort, but this stronger connection will ensure the posts stay safe and sturdy.
Always check with your local building codes for specific guidance on what is acceptable guardrail post connections in your area.
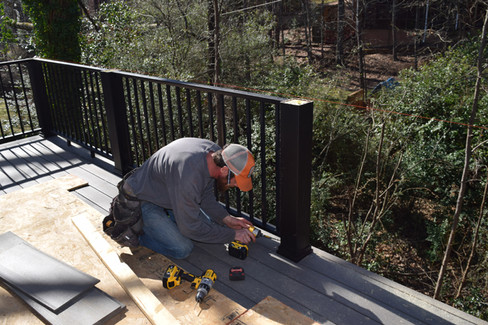
To install a rail system at the Martinez home, the crew from Canopy Construction notched the 4x4 posts to connect over the rim joists, trapping the lower portion inside the framing where they were toe-nailed and anchored with structural screws into the joist.


On this project, the crew installed composite post sleeves and composite rails with metal balusters. The post sleeves can be cut to fit using a fine-tooth saw blade to avoid chipping. (A carbide finish blade is recommended.)

These days, a wide range of kit-built systems are available from a number of manufacturers. A kit system’s predetermined measurements and fastening locations greatly simplify the assembly and installation of a deck rail. Once the posts are properly aligned, spaced and
firmly fastened in place, the remaining components are easy to put together.
The required components for each rail section generally include a Hardware Kit,
Rail Pack, Baluster Pack, Post Sleeves, Post Skirts, and Post Caps. Stair parts are also
available. Determine how many 6- or 8-ft. sections you need and make sure you have
all the components.

Shown are the components of the system used on this project; image © Timbertech
Note that on this project, the homeowner wanted to forgo post caps in favor of the drink rail, which is a continuous composite cap on the rail that covers the posts and is broad and flat enough to hold a beverage.
Post Sleeves
After the posts are installed square and plumb, the first step in assembly is to cut the post sleeves to length. The composite sleeves shown are made by Timbertech, and they were nailed in place, then decorated with a sleeve skirt that hides any fasteners at the bottom.
To ensure a level base for the drink rail that will eventually cap the posts, the builders fastened a level string line from corner post to corner post, which provided a guide to ensure all the posts were cut to the same height.


Panel Installation
On this project, the installers pre-assembled the remaining components and installed them as panels between the posts.
To do so, first measure each section between the posts. Before cutting the rails to length, determine your baluster spacing. Decide whether the rail will be cut with a baluster
in the center, or if the rail’s midpoint will be halfway between two balusters. This will ensure symmetrical layout of the balusters within each panel. Make sure both the top and bottom rails are cut to the same length.
Next, measure and mark all baluster locations (with maximum 4-in. center spacing),
then pre-drill the rails if necessary. Make sure the holes match on the top and bottom rails. Many kit systems include rails with baluster holes, which eliminates the need to pre-drill the fasteners.
Fasten the balusters by driving exterior-grade screws through the rails. The balusters usually include screw holes or threaded connectors that insert into their ends.
Next, attach the mounting brackets to the rail ends with the included screws.


On the bottom rails, screw on the Foot Blocks included with the rails. For sections up to 6 feet, use two Foot Blocks evenly spaced. For 8-ft. sections use three blocks to provide support that prevents any bending or sagging of the rail sections.
Make sure the rail panels are centered on each post, and attach them through the mounting brackets with coated screws.


The last step is the addition of the composite drink rail, which matches the composite deck boards.
The resulting kit-built system not only streamlines the installation process, but
it minimizes visible fasteners, offers rock-solid stability, and adds a neat, finished appearance to the outdoor space.
Shop around for deck rail systems and components to see what makes sense for your home. You’ll find lots of infill options, including a large selection of baluster styles, glass panels and cable-based systems, and even integrated lighting packages that brighten the night.


AV在线看 AV在线看;
自拍流出 自拍流出;
国产视频 国产视频;
日本无码 日本无码;
动漫肉番 动漫肉番;
吃瓜专区 吃瓜专区;
SM调教 SM调教;
ASMR ASMR;
国产探花 国产探花;
强奸乱伦 强奸乱伦;