
How to Pour a Concrete Slab
- Matt Weber

- Feb 17
- 4 min read
Updated: Apr 13

A concrete slab is one of the most basic components of modern construction throughout the world. Whether used as a building foundation, sidewalk, patio, or a footing for an exterior stairway, the construction is generally accomplished by the same method.
Small home projects can be handled by a do-it-yourselfer, but fair warning for DIY'ers: Mixing and pouring concrete requires a lot of physical labor. Concrete is very heavy, and a slab can require a lot of the stuff—more than you might expect. Although you can mix
small quantities with a shovel in a wheelbarrow, you might consider renting a concrete mixer even for small footing slabs such as the one constructed in this article. And for large projects such as driveways or sidewalks, the HIR staff recommends you hire a reputable concrete contractor.
Step 1: Mark the perimeter of the slab location with stakes and string.
Step 2: Calculate the total depth of the finished slab, including the concrete and the gravel base. Concrete is typically applied at a minimum of two inches, but we recommend a thickness of at least 4 inches for more durability. With this type of application, both a fine and coarse aggregate are required. You can find ready-mix bags of concrete available at home centers and hardware stores.

Step 3: Dig a level excavation to the depth and dimensions of your slab, plus room for the forming boards (2x4 or 2x6, depending on the depth of the slab).
Step 4: Compact the dirt bed with a hand tamper. The first base layer will consist of 5 inches of gravel (about 4 inches after compaction) followed by the concrete pour (at least another 4 inches). Shovel the gravel into the excavation and compact the gravel down to a 4-inch depth with a tamper.

Step 5: Build a concrete form using treated 2x lumber. Pros often use duplex nails to build the form, which are easy to pry out after the slab cures, but for a low-profile form like this, heavy-duty screws will work. The concrete form should frame the perimeter that you marked with the stakes and string. Depending on the application, the form may not necessarily have to be level, but it should always slope slightly away from any structure so that it can shed water away from it.
Step 6: Anchor the form in place by driving wood stakes into the ground along its outer edge every 12 to 18 inches and screwing the stakes into the frame. These hold the forms securely so they don’t bow or blow out when filled with the heavy concrete. With the stakes in place, cut the tops flush with the form, so you can use a screed board once the concrete is added.

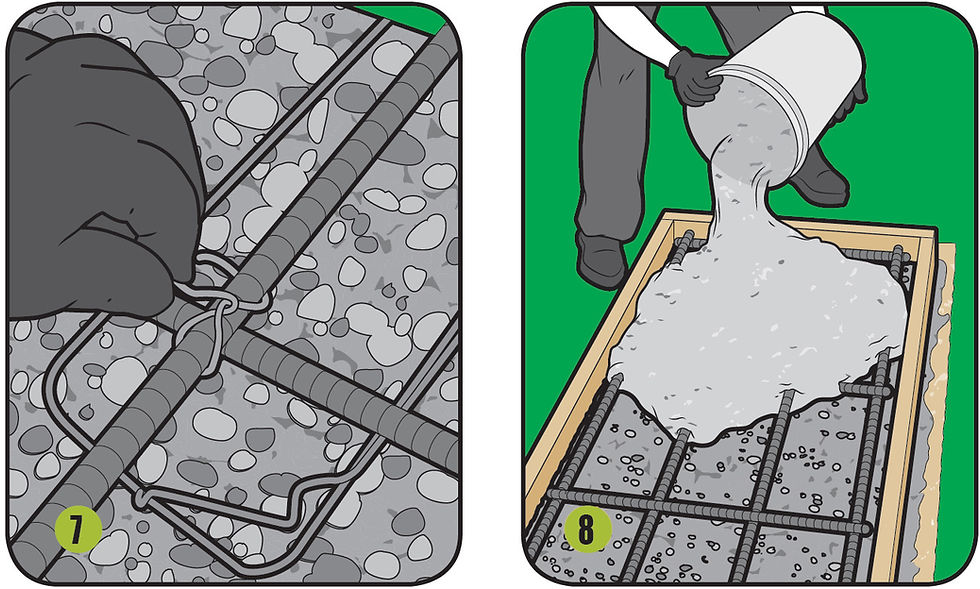
Step 7: Reinforce the slab with wire mesh or a grid of rebar. The wire or rebar grid should be elevated on blocks or metal brackets called "rebar chairs" that float the reinforcement about midway deep in the concrete forms (not on the bottom). Cut the metal with a grinder or a chop saw. Overlap the mesh/rebar 6 to 12 inches and tie the rebar intersections with wire.
Step 8: Mix up some concrete and then fill the form. Work one bucket at a time or just rent a concrete mixer. Spray the form and the gravel with water when adding the concrete. Work quickly—concrete starts setting in 30–60 minutes (faster in heat). Keep the entire work area damp throughout the installation of the concrete so the surroundings don’t leach moisture out of the concrete before it has properly cured.
Step 9: When the mix reaches the top of the forms, strike off the excess concrete even with the top by screeding it with a very straight 2 x 4. Move the edge of the screed board in a side-to-side motion across the upper edge of the form to create an even slab.
Step 10: Use a wood float in a circular motion to work the heavy aggregate below the concrete surface and bring the “cream” to the top. To give more traction to the
top of the slab, roughen the surface with a broom as the concrete cures.

Step 11: Allow the concrete to cure for a few days more before walking or building on top of it. Keep the slab covered in plastic to retain moisture longer for a slow, solid cure.

TO MAKE A JOINT
Large slabs, such as sidewalks and driveways, require expansion joints to prevent cracking. A jointer tool held against a straight edge will produce a nice, straight-line groove in the slab surface. Control joints are normally spaced at intervals that are equal to the width of the pour. However, you should avoid exceeding 10 feet in any direction without a joint. The joint should be cut to at least one-fourth of the depth of the slab. Control joints in large slabs can also be cut after the concrete cures, using a masonry blade in a circular saw or concrete saw after is had dried.

CURE YOUR CONCRETE
Concrete doesn’t get its strength from drying, but from curing. According to the experts at the Sakrete company, “Curing is the action taken to maintain moisture and temperature conditions in freshly placed cement mixes, allowing the cement to thoroughly hydrate.” This is done by misting the concrete, placing wet covers such as burlap on the concrete, or by coating with a product such as Cure ‘N Seal. Curing is necessary for the concrete to have its desired properties. Rapid loss of water from the surface of the concrete will cause the top of the slab to cure faster than the bottom. This can happen during periods of high temperature or wind. If the concrete cures at different rates, the slab can develop cracks.
--
Editor's note: A version of this article appeared in The Quick & Easy Home DIY Manual by Matt Weber.


Comments