
Setting Posts and Poles: Best Practices for Fence Installation with Concrete
- Matt Weber

- Jun 24, 2025
- 6 min read
Updated: Aug 5, 2025
By Dirk Tharpe

A fence installation or upgrade is a top project for many homeowners looking to boost their home’s curb appeal and increase the resale value. Fences enhance the overall aesthetic of a home while also serving as a functional means to improve privacy and security, particularly for homeowners with pets or small children.
An attractive, well-maintained fence provides homeowners with a good return on investment, meaning the quality of installation is key alongside material selection.
While most professionals know the basics for setting fence posts and poles, a good refresher is always beneficial during the home improvement season.
Project Prep + Building with Lumber
The first step when starting any project that requires more intensive construction is to align with local building code requirements to ensure compliance. There may be hurdles with an H.O.A., County Zoning Boards, or possibly even your local Historic Preservation Committee. Once code requirements and any permitting are secured, it’s time to get to work.
After determining the location of the fence on the property, the first step is to run a string line from just past a corner of the fence to the end of the section, in a straight line. Drive stakes on each end of the run and pull the string tight. Repeat the process until the fence is laid out. This string placement is crucial, as it will be used to line up the fence post faces.
Excavation
Determining the hole depth is a crucial detail when beginning the fence installation. To avoid frost heave, it is advised that the hole depth be dug six inches below the frost line, which varies from region to region. Once you have confirmed this detail, you can begin digging to place the fence posts.
When working with traditional lumber (cedar, cypress, redwood, pressure-treated), there are rules of thumb for the depth and width of the post holes. The width of the hole should be about three times the width of the post, and the depth of the hole should be 1/3 the height of the finished post. Tools like Sakrete’s Post Setting Calculator are helpful for determining how much concrete you need for setting, providing a fast, precise estimate.
A best practice for digging each hole is to create an inverted cone shape in the ground. Shaping the bottom of the hole wider than the top will lead to the best results.
Once the hole-digging is complete, fill the bottoms of each hole with a four to six-inch layer of gravel. This is needed when working with lumber to improve drainage, as wood posts are susceptible to wood rot. You can use the bottom of the post to compact this layer before moving on to setting with concrete.

Setting The Posts: Fast Setting for Ease, Efficiency
Setting posts can be a dusty task. Before you start the post-setting process, be sure you and your team are wearing proper respiratory protection. Once your team has donned their PPE, begin placing the posts within the center of the holes.
It's recommended to use fast-setting concrete to set your posts as quickly as possible. A fast-setting concrete mix will set within 30 minutes at warm temperatures, allowing you to work efficiently.
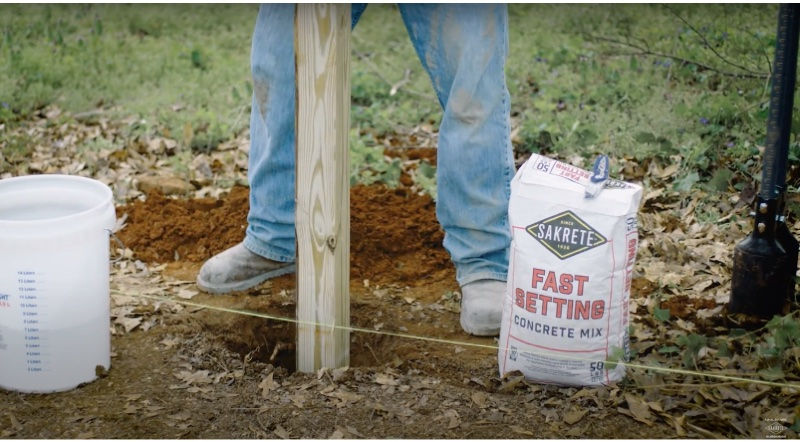
To begin the setting process, fill the hole about 1/3 of the way with water. Next, add your fast-setting concrete mix, straight from the bag, until it reaches the top of the post hole. If it appears too dry, add water to the top.

Fast-setting concrete mix does not require mixing when setting a post. There is no need to backfill the hole with dirt, as it is filled and topped with concrete. If possible, slope the top of the concrete down and away from the base of the post for proper drainage.

With the post set in fresh concrete, it is time to plumb the post. In warmer weather, remember to move fast, as fast-setting concrete will clearly demonstrate its name. Place a level longways or lengthwise on the post and adjust front to back until it is straight, then repeat the process on the side of the post, plumbing left to right. Once the center has been reached, hold the post firmly for 3 to 5 minutes. Once the concrete tightens or “bites,” let go of the post and do not disturb. Move on to the next hole and post, and repeat the process.
To clarify, the 30-minute set listed on Fast Setting Concrete Mix packaging and in the Technical Data Sheets refers to “initial set.” This is a lab test to determine when the mortar paste reaches 500-psi. In field use, you have 3 to 5 minutes to complete the plumbing of the post. Wait until after the 30-minute set time before attaching ribs to the newly set posts.
The concrete procedures described above only apply to fence construction when using a Fast-Setting Concrete Mix. When using a conventional concrete mix, such as Sakrete High Strength Concrete Mix, you must first mix the concrete with the designated water content and then pour it into the hole around the post, following the steps previously discussed, through the plumbing of the post. As the center is found left to right, have a helper secure the position with a wooden brace. Repeat the process to find the center from front to back and brace. Each post should be left alone to set and cure overnight. Begin the next day by removing the braces, then start attaching the ribs for the fence.
Working with Premium Fence Materials
While most homeowners historically have wooden fences around their property, many are making the move to premium materials. Vinyl, powder-coated aluminum and mixed material fence solutions offer more aesthetic options alongside several functional benefits.
Materials like vinyl and aluminum require much less maintenance than traditional wood, with minimal cleaning needed to keep them looking new. These materials are not prone to rotting, warping, and cracking like wood fences. The longevity of wood-fence alternatives gives homeowners more flexibility, with just a bit more upfront investment required.
Many of these materials also provide added safety benefits. Products like vinyl are typically third-party tested for impact resistance to see how they withstand weather events, severe wind and even fire. Their ratings can prove beneficial when selling clients on a premium fence solution or giving them extra peace of mind.
The steps for installing these fence materials are not that dissimilar to working with lumber. You’ll conduct the same prep work but should consult the manufacturer’s instructions on how deep to dig, as premium materials are not as affected by frost. Fast-setting concrete works in these applications, but again, you should consult the manufacturer’s instructions to devise your post anchoring technique and plan. Do not anchor posts with dry concrete. Packing dry concrete around a post has little benefit over compacted soil.
Making the Right Choice for Your Clients
If you’re a pro working with a client on a new or upgraded fence project, talk through their priorities, budget and design ideas. This will allow you to work together to choose the best material for their outcome and meet their desired timeframe. If clients are seeking something more durable and can allocate a larger budget upfront, a premium fence solution will be the best option to meet their needs.
Consulting these best practices and the manufacturer’s instructions will arm you with the knowledge you need to get the job done well and fast.
--
Side Note
Bracing Posts While the Concrete Cures
There are many reasons to set a post in concrete, from building a fence or a mailbox to supporting a deck or a pergola. For tall, heavy posts, you might find it helpful to construct temporary bracing to keep the post vertical as the High Strength Concrete Mix cures overnight. For this you are going to need wood stakes and some lumber boards to serve as battens (1x4 or 2x4 will work).

After compacting the gravel base in the post hole, set the post inside and screw a length of batten to one face of the square post. Attached the second batten onto an adjacent side so that they are at 90 degrees to each other at least 18-24 inches up from ground level.
Bed the post down into the gravel about an inch and let the ends of battens pivot downward to rest on the ground. Ensure the post is square in the hole. Hammer stakes into the ground alongside the battens and just a few inches away from their ends.
Use a spirit level or post level to get the post vertically plumb, left to right and front to back. Once it is in place, screw the battens into the stakes to hold the post in position while you set it with the concrete.


Thanks for the awesome tips! We learned a lot about setting posts the right way. As a concrete company Port Saint Lucie homeowners trust, we’re always looking to improve our work. Your clear steps and safety reminders really helped. We’ll be using this advice on future projects!
Thanks! This was super helpful. We work on concrete driveway Augusta projects, and your post gave us great reminders for setting posts right. We really liked the tips about fast-setting concrete. We appreciate the time you took to share this helpful guide—our team learned a lot!
OvaGames bisa menjadi solusi untuk koleksi game lengkap.
This is an excellent and detailed guide on best practices for setting posts and poles with concrete. A strong foundation is essential not just for fences but also for any long-term project. I appreciate the clear instructions and helpful tips provided here.
Similarly, at Qibla Gateway, we believe in laying a solid foundation for unforgettable journeys by offering some of the cheapest Umrah packages for travelers from the USA. Proper planning ensures a meaningful and smooth spiritual experience.
Thanks for sharing such useful content!
Your trusted team—visit for plumbing help.