
Painting Kitchen Cabinets
- Matt Weber
- Oct 16, 2023
- 9 min read
Updated: Oct 17, 2023
How to Paint Poly-coated Cabinets like the Pros

Changing the cabinet color is one of the more impactful alterations you can make during a kitchen remodel. Cabinets occupy so much square footage along the wall that they serve as a focal point for most kitchen designs. The cabinet finish should integrate perfectly into a surrounding decorative scheme, so a color change is usually on the wish-list whenever the room gets a major renovation. Professional painters make good money painting kitchen cabinets because the job involves a lot of work and they know there’s a right way and wrong way to achieve lasting results. Here’s a look at what the pros know.

Before: Oak cabinets in need of a facelift.
Changing the Finish
A word of warning to anyone who has yet to paint cabinets: The job requires a lot of time and labor. The work is not exactly difficult, but it is repetitive, requires meticulous attention to detail, and there is no way to speed up the process or cut corners without sacrificing the integrity of your paint finish. DIY’ers should expect to spend roughly a week working on the project, allowing for drying times.
To change the color of pre-painted cabinets, they might only need a thorough cleaning, a coat of primer/sealer, and two new coats of paint. That situation, or painting unfinished cabinets, is the easiest circumstance to work under.
However, cabinets finished with polyurethane, varnish, or a glaze have been given a protective coating to prevent stains and water penetration—meaning the surface resists anything bonding to it. To ensure the new paint will bond to the cabinets requires several phases of surface preparation. Because of this extra work involved, the cost for a professional to paint 144 square feet of poly-finished cabinets could range between $2,800 and $3,500, according to the estimates listed at Homewyse.com.
An effective but labor-intensive approach would be to use a chemical stripper or power sander to remove the old finish entirely, then to begin anew as though painting unfinished cabinets. Caustic paint strippers generate a lot of fumes and a great deal of mess, though. Sanders create a mess too, albeit a dryer and dustier one. Nevertheless, for basic shaker-style cabinets with flat and square edges, sanding off the finish might be the simplest way to remove the poly and prepare for paint.
However, sanding the swoops, edges, and ogees of decorative trim is more difficult. Sanding the detailed profiles of frame-and-panel doors and other similar styles can result in accidental damage to the trim.
An alternative to sanding poly-finished cabinets is to give them a thorough cleaning, to scuff-sand the surface, then to apply a liquid surface-bonding product that professional painters generically call “liquid sandpaper.”
The project requires substantial prep work, including TSP cleaning, scuff-sanding, “liquid sandpaper” and primer.
Choose the Right Paint
Purchase a high-quality paint intended for cabinets, which will provide a smooth finish.
The best cabinet paints have self-leveling properties. A gloss finish will give your cabinets a sheen but may show a lot of dents or dings. Semi-gloss or satin finishes are typically used for kitchens. Flat finish paints can be difficult to clean.
Edges and trim can be painted with a brush. To achieve a smooth finish on flat surfaces, you’ll get the best results using a High-Volume/Low-Pressure sprayer or using a 4-inch paint roller with a 1/4-in. mohair nap cover.

When removing the doors, number them with painter’s tape for easy identification when reinstalling them.

Drawer removal may not be necessary if the faces can be detached.
Prepping the Surface
Remove the doors and drawers, beginning at the bottom hinge and working toward the top on each one. Use painter’s tape to label the doors in sequence for easy identification when reinstalling them. Unscrew all the metal handles or pulls and store safely along with the hinges and other hardware.
Depending on the construction of your cabinet drawers, it may not be necessary to remove the entire drawer. In some cases, the decorative faces are screwed onto the drawer fronts from the back, and you can remove the faces only.
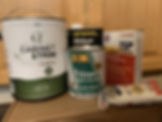
Gather all supplies, paint, primer and TSP (trisodium phosphate). Mask off the cabinet case with painter’s tape and the surrounding work area with plastic drop cloth. Arrange plenty of work space and designate a covered area for the doors to dry during the various prep and paint phases.

First step is a thorough scrubbing with a TSP solution and a stripping pad. Rinse the surface after washing.
First step is a thorough cleaning. Mix 1/2 cup powdered TSP with 2 gallons of water.
Using gloves and 220-grit stripping pad, scrub all surfaces to be painted with the TSP mixture. Be thorough; you’ll be surprised how much grease and grime builds up on cabinets that is not always visible to the naked eye. Use a clean damp cloth to rinse off the TSP.
After all the cabinet surfaces have been cleaned and dried, front and back, scuff-sand those same surfaces with 220-grit abrasive. Sand in the direction of the wood grain. Work the surface so a white powder shows on the surface, which indicates that the poly coating is coming off. This phase is called “de-glossing and etching,” and the abrasion gives the surface “tooth” that aids in bonding the paint to the surface.

Sand the entire surface with 220-grit abrasive.

You’ll need a variety of sanding equipment. A 220-grit stripping pad will flex to conform to curved profiles.

Blow the dust off the surface with compressed air and wipe the residue away with a tack cloth.
Sanding blocks cover the most surface area for door faces and case sides. Flexible stripping pads can conform to the curved shapes of decorative trim. The sides of cabinet cases are sometimes covered with a laminate material, which doesn’t have a true woodgrain, making the surface more suitable for an orbital power sander. All surfaces should be scuff-sanded to improve the bond with the paint.
Once sanding is complete, it’s important to remove all the dust from the surface. Spray off the sanded surfaces with a leaf blower or compressed air, then wipe all surfaces down with a tack cloth to remove any remaining residue.
Next step is to apply the “liquid sandpaper.” Available from a variety of manufacturers, the brand of Liquid Surface Preparation we used is called Wil-Bond (recommended by our friend Rob Robillard, “The Concorde Carpenter”). Note that a primer/sealer must be applied to the cabinet surface within 30 minutes of applying the Wil-Bond, so during this phase, plan on working with three or four doors at time.
Work in a well-ventilated area wearing safety gloves, eyewear and a respiratory mask, because the liquid surface preparation produces noxious fumes. Stay far away from open flames.
Saturate a rag with Wil-Bond and rub it over the cabinet surface until the rag “pulls” or “drags.” This stickiness will help ensure the primer coat goes on smoothly and lasts longer. Change the rag frequently as it picks up lint or debris.

Wil-Bond is the brand name of our “liquid sandpaper.” When using the product, wear safety equipment and work in a well-ventilated area away from flame.

Apply the liquid surface preparer with a saturated cloth, rubbing until the rag drags or pulls, indicating the surface is ready for application of the primer.
Make sure you have all of your priming supplies set up and ready to go. Remember once you start applying the “liquid sandpaper” you have half an hour for the “tack” to remain active and for you to apply primer with a sprayer, roller or brush.
Repeat the liquid prep/primer application procedure on all doors, cabinet case, and any surface to be painted. Once finished, promptly dispose of the chemically soaked rags outdoors in a metal container, because they are a fire hazard.
The good news is that after the primer has been applied, all the extra prep work due to the poly-coat finish is over. You’re now dealing with a freshly primed batch of doors ready to paint with the same standard procedures as any interior painting job.
Paint Application
Although a mohair roller with a 1/4-in. nap can achieve a nice, smooth coat, you’ll probably appreciate the faster time-saving speed of a HVLP sprayer.
You can pick up a quality Wagner sprayer with an integrated air turbine for as little as $80. This design keeps the airflow consistent and the pressure regulated for ideal spray performance. Faster than a brush to provide quick and easy coverage, the HVLP sprayer typically has a nozzle that adjusts the spray pattern for either vertical or horizontal fan.
Strain the paint when loading the sprayer. Before painting the cabinets, always check the fan pattern and flow rate to make sure you have the sprayer’s pressure and material flow dialed in to deliver the smooth finish you expect. Make any necessary adjustments according to the manufacturer’s instructions. Hold the HVLP nozzle perpendicular to the surface and 7 inches away, applying the paint using a back-and-forth motion in a consistent pattern and overlapping to ensure coverage.

Apply the primer within 30 minutes of applying the liquid sandpaper.
Don’t skimp on the second coat of paint. Kitchen cabinets should get a coat of primer plus two coats of quality top-coat.
Once the second coat is dry, you’re ready to reassemble the cabinets. Hang the doors, beginning at the top hinge and working downward. Consider applying felt pads to the backs of the door corners so they close softly and protect the new paint.

A lightweight orbital sander can speed up the sanding of the cabinet case.

Don’t overlook the corners, which you can access with a square sanding block.

Mask off anything that you don’t want painted. Our team prefers using Frog Tape because it creates a seal when it comes in contact with paint.

The cabinet case gets the same preparation as the doors: cleaning, sanding, liquid sandpaper, then primer.

Your choice of cabinet paint should be a key consideration. The new C2 Cabinet and Trim Paint is specifically designed to achieve an easy, smooth finish with a short drying time. Paint tools also clean up easily with soap and water.

Once the primer has dried, you’re ready to roll with your new top coat.

As with any painting project, first cut in the edges with a brush.

A 4” roller with a 1/4” mohair nap will achieve a smooth paint finish in areas where you want to avoid using a sprayer due to its overspray.

Increase the productivity of your paint project by arranging a large, sheltered work area where you can spray multiple doors at once.

Stand the doors so you can spray them without paint collecting along the edges. Shown here, we lean the door against blocking and rest the bottom on triangular wood strips so all edges can be sprayed without paint accumulation.

Any joints or seams in the case can be sealed with caulk after the painting is complete.
Tool Spotights

Wagner Flexio 3500 HVLP Sprayer
Homeowners who tackle paint and stain projects will appreciate the performance and easy use of the Wagner FLEXiO 3500. It applies a smooth, consistent finish to a wide range of interior and exterior projects and applies paint 10X faster than a brush. It can spray unthinned paints and stains right from the can. The sprayer features a compact, lightweight design that makes it easy to handle. It includes two nozzles: the iSpray nozzle for spraying broad surfaces like walls and a Detail Finish nozzle for spraying a smooth, fine finish on projects like cabinets and furniture. It also features multiple adjustable settings to suit your project needs, including an adjustable flow control, spray width, spray pattern and variable speed power dial. Visit www.wagnerspraytech.com.
Diablo Sanders

Diablo Tools has a full line of sanding sponges and pads, which conform to round or uneven surfaces better than a standard flat, rigid block. Diablo also offers sanding blocks made of a flexible, sponge-like material. They’re lightweight and dual sided with a “stiff” side and “soft” side, each of which can be fitted with a different abrasive so the tool can function as two sanders in one. Kitchen cabinets require a lot of sanding, so reusability is a nice feature in sanding equipment, and the blocks use Diablo’s SandNet sanding sheets with reusable technology. The SandNet sheets offer up to 10x longer life versus standard sandpaper. Each SandNet sheet features a clog-reducing nylon net design coated in a ceramic-blend grit for fast material removal while reducing buildup. The sheets are easy to clean and reuse multiple times by shaking, vacuuming, or rinsing the sheet to remove any pitch buildup. Visit www.diablotools.com.
Bosch 18V Brushless 5” Random Orbit Sander

The new 18V GEX18V-5 random orbit sander from Bosch is lightweight and easy to use, even on vertical surfaces such as cabinet cases. The new sander features a well-balanced ergonomic palm grip, which allows your hand to be closest to the work material to avoid tilting and pressing down, for best results. The easy-to-reach on/off switch offers intuitive operation. It has a vibration-dampening element to help minimize user fatigue. The powerful 18V brushless motor delivers similar stock removal to a corded sander. The speed selector delivers best results in different materials and applications. The sander has a 5-in. 8-hole sanding pad, which provides optimal dust collection when the sander is attached to a vacuum or a dust bag. Visit www.boschtools.com.